Recent Water Damage Posts
Ways To Prevent Flood Damage In Your Home
8/14/2023 (Permalink)
No homeowner wants to watch their belongings washed away in one single day. This is why many of them take preventative measures to protect their home from flooding. As a homeowner, you should take these precautions as well.
In the long run, it will protect your property from being prone to water damage and flooding. Here are a few steps you can take to prevent flood damage in your home.
#1. Landscaping
Many people underestimate the power of a landscaping job well done. This is perhaps the best solution for keeping your home safe from flood damage. Keep your landscaping groomed by always keeping your gutters and splash pads clean.
This will ensure that no debris is blocking the flow of water going away from your home. Apart from that, you can utilize a rain barrel to collect the rainwater runoff.
It will protect the rainwater from pooling too much and you can use it for watering plants in your yard and garden.
#2. Monitor The Foundation Of Your Home
This is the most basic maintenance you need to do for your home. Foundations of homes can develop cracks over time. These cracks can let water seep in and this can widen the cracks further.
If the cracks get too wide then your house will be damaged by flooding. So, to protect your home from this you need to monitor your foundation and fill up any cracks with mortar or masonry caulk if they appear.
However, if your foundation continues to have cracks with time then you will need to call a professional to fix this issue as this is the biggest reason for flood damage.
#3. Seal Open Areas Of Your Home
Even if you monitor the foundation and fill the cracks, you still need to seal other areas in your home. These include walls, windows, and doorways.
Give them an extra coat of protection by applying a sealant. This will prevent rainwater from coming into your home. It is the biggest protector of homes from harsh weather conditions.
#4. Install Drain Plugs
This is the most overlooked measure but it is also just as important as any other. That is because your home can be prone to flood damage because of your sewage. If it backs up then it can get clogged which will eventually lead to flood damage.
This is why you should install drain plugs inside the floor drains in your basement. Doing so will ensure that your home doesn't get flooded through the toilet or sinks. Installing drain plugs is an integral component of keeping your home safe from flood damage.
Final Words
These are the top four ways you can utilize to protect your home from extensive flood damage. Taking these preventative measures early on will keep you from having an extensive problem in the future.
If there is any damage in your home and you need restoration then call our experts at SERVPRO. We will be happy to assist you and make sure your home is safe from all sorts of damage. Get in touch with us now.
Water Damage Restoration Tips And Tricks
8/14/2023 (Permalink)
Has your home or office experienced any water damage? Taking immediate action will only minimize the damage further. This is why you need to take action as soon as possible. Even though you need the services of experts in water damage remediation, there are many things that you can do yourself to minimize the loss. So, if your property has been damaged by water you need to follow some tricks and tips. Following these tips will ensure that the damage is minimized and will also ensure the safety of people present on the site. Want to know what these tips and tricks are? Keep reading then.
Dry Out The Affected Area
To minimize the damage, you must dry out the affected area as soon as possible. The presence of moisture in the affected area will only damage it further. This is why you need to be as thorough as possible. In smaller spaces, you can use fans to dry out the area affected by water. But, fans will not be effective in large spaces. So, if you need to dry out the larger space you can rent a large capacity dehumidifier.
Disinfect The Area
Once the area has been dried out and the damaged components have been removed, you need to disinfect the whole area before you start using it. Disinfecting the area is important so that the mold does not grow there. There are many ways through which you can disinfect the area but mostly bleach is used by the people. If you are not comfortable with using bleach, there are many other options that you can use instead.
Repair The Ceiling First
The ceilings that are damaged with water are riskier than other areas. This is why you need to repair them first or else they will collapse. If the damage is beyond control, you will need to remove the affected ceiling or boards. If it is repairable, then you can repair it as well. To repair the leaking ceiling, you must find the source of the leak first. Meanwhile, you need to make sure that the water does not cause any structural damage to your property.
Replace Damaged Wood
The wood that has been damaged by water will rot and develop mold on it. This is why it needs to be replaced as soon as possible. But, before replacing the damaged woods, you need to thoroughly clean the area beneath the wood. Also, you need to be careful about the placement as well and make sure that the structure has the right support.
Contact Professionals
The professionals can take of your damaged property in ways that you cannot do it yourself. So, if your property has been damaged by water, it is advisable that you avail the services of a professional company that can restore the place to its original form.
If your property has been damaged by water, you should take immediate action to restore the place back to its original form. It is an extremely important job that needs expert supervision. So, if you are looking for a team of professionals that would take care of your property, you must contact SERVPRO of Woodbury/Deptford and avail the professional services.
The Benefits of Using a Professional Restoration Company amid Flood Damage
12/27/2021 (Permalink)
Floods and water damage can be devastating for any home or business. There is a lot to consider, such as how much damage has been done and where the flood came from. If you are trying to clean up your property following a flood, it is important that you hire professionals who have experience with this type of work. A professional water restoration company will know how to extract standing water, dry out carpets/carpeting, remove mud from floors, and do mold remediation if necessary and more!
They Can Assess the Real Damage to Your Property
Floods can cause a lot of damage to your property, and it is important for you to have someone who knows what they are doing assess the situation. Water restoration professionals will know exactly how much water has been absorbed into all of your materials including floors, walls, carpets/carpeting and more! This way everything can be dried out efficiently in order to prevent further damages from occurring.
They Can Offer A Long Lasting Solution to Your Water Damage Problem
When there is water damage to your property, it can lead to mold growth and other problems. Instead of trying to fix the situation on your own with DIY methods that may not work long term, you should hire a professional restoration company who knows exactly what they are doing when it comes to getting rid of any standing water or debris left behind after floods! They will do all the dirty work for you so that everything looks fresh again without having to worry about potential damages in the future because you tried fixing things yourself.
They Know How to Clean Up After Flood Damage Easily and Effectively
Restoration companies have equipment at their disposal such as dehumidifiers, blowers/vacuums, moisture meter devices and more! This way everything can be dried out efficiently and effectively. They will also have the knowledge of how to remove standing water from all types of surfaces including carpet, hardwood flooring, concrete/tile floors and more! With this equipment they are able to extract any moisture that has been absorbed into your materials as well as dry up wet carpets which is a big part of restoring your home after having flooded.
They Can Help Prevent Mold Growth
One of the main problems with having flooded properties is that there tends to be standing water for days, weeks or even months at a time depending on where exactly you live. If not properly taken care of such as drying out carpets/carpeting and removing mud from floors then this could result in mold growth behind walls or other surfaces which nobody wants. You should always leave these types of concerns into the hands of professionals who are experienced in restoring properties after having flooded. They know exactly how to dry out carpets/carpeting, remove mud from floors and prevent mold growth so that your home is restored back to its pre-flood condition with ease!
They Can Help Restore Your Property Back To Its Pre-Flood Condition
After you have experienced flooding in your property it can be hard for some people to get their lives back on track because they are concerned about fixing the situation themselves or hiring a professional who may not do everything properly. If you hire professionals however, they will restore all of your materials such as walls, floors, furniture etc. Back to its pre-flood state without any problems whatsoever which makes life easier when trying to move past something like this!
They Will Make Sure Everything Is Done Professionally
Regardless of how severe your water damage is (whether it was caused by a burst pipe, broken washing machine or more) you should always hire professionals to restore your property back to its pre-flood condition. This way everything can be done efficiently and effectively without any problems along the way. They will also use quality materials when restoring anything in order for all surfaces such as walls/walls, floors/carpets etc. To look fresh again just like they did before having experienced flooding. In this case hiring a professional restoration company works wonders because they have experience with fixing properties after flooding which makes life so much easier afterward!
Is Water Damage Actually Preventable?
12/27/2021 (Permalink)
Water damage is one of the most common causes for property damage, and can cost you tens of thousands of dollars. It can cause problems for both homeowners and businesses alike. This article will explore how to prevent water damage by taking some simple precautions.
Clean Roof Gutters Regularly
Water damage is caused when water flows over the top of your roof gutters, spilling into cracks or crevices in the exterior walls or foundation. To prevent this from happening you should clean out your gutters regularly and ensure that they are pitched towards downspouts so that rainwater can drain away safely.
Avoid Leaking Faucets and Pipes
Leaks in plumbing systems will also cause significant amounts of water damage if not repaired quickly, but it is usually fairly cheap to do so compared to other forms of property damage like mold remediation . You should check for leaks frequently around faucets and pipes which might be dripping slowly; these types of slow-leaks can eventually add up to large amounts of wasted water (and money).
Keep Your Plumbing Fully Maintained
Just like checking for leaks, you should also ensure that your plumbing system is fully maintained. Preventative maintenance will keep both the inside and outside of pipes free from corrosion or buildup which can eventually lead to serious water damage. You can have a plumber come out once every year or so to inspect important fixtures in your home too--anywhere there are toilets, sinks, showers etc.
Use Appliances Sparingly
Water damage isn't just caused by direct exposure to rainwater; it's possible to get water damage when you use appliances around the house too much, especially if they rely on hot water (like dish washers). It might seem counterintuitive at first but using heating systems sparingly during winter months will actually help to prevent water damage inside your home, and it will also save you money in the long run.
Use Reasonable Amount of Water When Landscaping
You should also be aware of how much water you might use when landscaping. Watering your lawn outside with too high a pressure can actually damage the foundation around your home, which is obviously what we are trying to avoid here! You should consider using rainwater or grey-water from showers for outdoor purposes if possible; this will cut down on consumption while still allowing you to keep up appearances in front of visitors and neighbors alike.
Hire SERVPRO to Get a Personalized Plan on How You Can Prevent Water Damage to Your Property
Water damage is one of those problems that will affect virtually every homeowner at some point in time. The good news is that it's usually fairly easy to prevent with a little bit of proactive maintenance and attention. If you'd like additional help or guidance on how to keep your home protected against water damage, contact SERVPRO for professional assistance.
How to Stop Water from Entering Your House during a Flood
12/27/2021 (Permalink)
A flood is a natural disaster that can devastate your home. There are many ways to prevent this from happening, but one of the best is simply by getting a watertight door for your house. This will keep the water out and allow you to rest easy knowing that you won't be losing everything in the process. In this blog post, we will talk about how to stop water from entering your house during a flood!
Let’s take a look at some ways you can stop the water from entering inside your house.
Flood Prevention Door and Windows
The first thing you will need to do is find a door that has been specifically designed for flood prevention. These doors are designed to keep out water, but they can also be used as regular storm protection if needed! This means that it's the best of both worlds and you won't have to worry about sacrificing functionality. It should come with an airtight seal, so you can keep the water out for good. Make sure that your door is properly attached to its frame! You will need screws or bolts in order to do this. This way it won't be able to shift around with all of the pressure from the flood waters outside and end up letting them seep into your house anyway. It's also a smart idea to apply an extra layer of protection using waterproof caulk too! A little bit goes a long way here since you'll want as much resistance against water as possible.
Keep the Foundations A Little Higher When Getting the House Built
It's also important that the foundations of your home are a little higher. You will want to place them about six inches above where they would normally sit so that any water coming in can't reach up high enough to seep through anyway. This is because even if all of the other precautions were taken when building your house, this one simple step could save everything from being swept away during heavy rainfall or flooding conditions! Just remember not to make the foundations too tall either since they need certain levels of support for stability reasons as well.
Sump Pumps
The sump pumps are another thing to consider, as you will want these draining out properly so nothing gets backed up either way. If water can't escape your house, it's going to start pooling around indoors instead which could mean a whole lot more damage in some cases especially once flooding becomes involved at all. You might even consider adding an extra one or two just for good measure since heavy rainfall tends to increase over time as well no matter what kind of area you live in.
Once you have finished applying these flood prevention methods, your house should be completely sealed and ready to go!
Things that a water restoration company can do for you
12/27/2021 (Permalink)
When you have water damage in your home, it is very important to get the issue resolved quickly. This will help prevent mold and mildew from growing on wet surfaces around your house. It can also reduce the chance of more serious health problems when they are not treated properly. If you need a water restoration company to come out and take care of this for you, here is what they might do:
Assess damage to belongings
They take a look around your home to see what might be ruined, including furniture and flooring materials. This helps you know how much restoration work needs to happen in order for things to go back to normal again.
Remove sopping carpets
They will take out any wet carpeting and get it dried in a way that prevents mold from growing on the fiber. In some cases, they may need to be replaced. This is only if the water damage was severe enough for this to happen. If not, then you can save some money on the restoration work.
Clean and sanitize surfaces
They will wash down any walls or other places where water damage happened to remove dirt, mildew, mold, bacteria and other germs that might cause illness for you or your family members if they are not killed through cleaning. Then, they leave everything to dry out in the open air for a while.
Fix any water damage that happened
If there was plumbing damage or some other type of issue, they can fix it right away so you don't have to worry about further problems with the house down the road when these issues are ignored. This is necessary if your home is going to be safe for you and your family.
Provide warranty on all work
They offer warranties for any restoration services they do, which means if anything goes wrong in the future then they will be able to come back and fix it for you.
Dehumidify the air to reduce moisture levels in your home
When you find out that there is a problem with water damage, it is important to take care of this as soon as possible. If it goes untreated for too long, then your house may start to smell bad or have mold growing on the surfaces. This is when you should call a water restoration company to come out and do the work for you in an urgent manner. They will be able to remove the standing water, which means that there won't be any more surface damage done or mold growing on your walls or furniture.
These are just some of the things that they might do for you when it is time to call in professionals. There are many other services out there as well so be sure to find out what else they can offer in addition to the ones mentioned above.
How to Assess Water Damage after a Flood
12/1/2021 (Permalink)
Water damage is a major issue that can occur in any home. Flooding has become a more common occurrence due to rising sea levels and natural disasters. This blog post will provide you with information on how to assess your water damage after a flood, as well as tips for what to do next if the flooding was caused by something else!
Inspect the Pipes and See If the Sewerage System Is Blocked
The first thing you should do is inspect the ventilation system and see if it has been clogged. The water damage may have occurred because of a blockage in one or more parts of your home's plumbing, usually near where sewage exits into the drainage system. If there are any visible signs of flooding on these pipes, including leaks or cracks, call your local plumber after reading this blog post to learn what they can do about them! Cleaning Your Flood-Damaged Home Can Prevent More Damage from Occurring
Closely monitor all appliances that use electricity. Be sure not to try to use anything electrical until everything has dried out completely (and even then only turn something back on once every hour). It is also important that you keep your house as ventilated as possible by opening windows and doors. Do not skip this step! It is important that you use a fan to remove moist air from the building as often as possible, especially during heavy rainfall or when it’s humid outside.
Check your furniture and other items inside your house if the water was able to get in
After the water damage has been assessed, you can begin cleaning up! Remove items that have been damaged by moisture and evaluate them to see if they are salvageable. If you find any furniture or appliances in your home with mold growing on them, throw these things out immediately because even a small amount of growth can generate health effects. While many homeowners choose to hire professional cleaners for this part of their post-flood restoration process, some decide it is more cost effective (and doable) to clean everything themselves using products like bleach and detergents which will kill harmful spores after three minutes at 20° Celsius. Dry off all surfaces such as floors and walls before mopping since excess moisture could cause bacteria to grow inside.
You may also notice that some of your belongings have been damaged by the water including books, CDs and clothes which you should clean using a vacuum cleaner with a HEPA filter to remove any dust or bacteria before throwing them out. You can do this yourself if you feel comfortable enough but many people choose to hire professional cleaners who specialize in cleaning mold from clothing and furniture items for this task instead! In addition to dry-cleaning materials such as clothes, blankets and pillows it is important that you get rid of all wet carpets, rugs or other textiles immediately since these will become home to dangerous molds if not removed within 48 hours of flooding occurring.
Inspect your lawn for any water damage
Even if you are not allowed to stay in your house after it has been flooded, make sure that you do not neglect any of the exterior spaces. Check for cracks or leaks on patios and driveways as well as broken irrigation systems since they may have contributed towards flooding occurring inside your home. A landscaping professional should be able to repair these problems easily so long as it is done soon enough!
Water Damage Restoration Companies like SERVPRO can save your property and its value
11/29/2021 (Permalink)
Water Damage Restoration Companies like SERVPRO can save your property and its value
It is important to know that there are water damage restoration companies out there who can help you if your property has been damaged. SERVPRO is one of the best restoration companies in the country, and they provide professional services for both residential and commercial properties. Their teams will come on site with all necessary equipment to begin their work as quickly as possible, so your property can be restored back to its original condition. Whether it's water damage or fire damage, SERVPRO professionals will help save your property!
How Can a Water Damage Restoration Company Boost the Value of Your Property?
Water damage restoration companies can help save your property, but it's also important to know that a water removal company can make sure you get the best price possible when selling. If your home or business has been damaged by flooding from severe weather conditions, SERVPRO professionals will take care of everything for you. They'll extract all standing water and restore your property back to its original state. If you're selling, having a professional water damage restoration company come in and make your home look good as new will give the buyer peace of mind that everything is up to par. They'll be more confident buying from you, resulting in better offers!
Restoration companies not only dry up your house, they also remove mold and the results are usually long lasting when there is a professional company involved. This can also increase the resale value of your house. Clean sewerage system and up to date and well maintained plumbing all add up to the overall value of the property.
If You Are Looking For a Water Damage Restoration Company In Your Area Then What Should You Do
Water damage restoration companies are available all over America, so don't hesitate to contact one if your property has been damaged by any kind of water or flooding event. Not only can they help save your home or business with their services but they can also increase the value when it comes time for resale. Searching online is easy too; if you are in Woodbury, then you can get in touch with professional at SERVPRO. You can contact us anytime of the day or night, and we'll come onsite right away. We work around the clock to make sure your property is drying up as quickly as possible!
Without proper restoration after water damage, you will never be able to get the right price for your house. SERVPRO is one of the best water damage restoration companies in America and they will make sure you get maximum dollar for your home or business.
A Water Damage Restoration Company Like SERVPRO Can Be A Good Investment For Your Property!
Water damage can cause a lot of stress, but you don't have to go through it alone because there are many water removal services available to help save your property and increase its value when it comes time for resale. If you want peace of mind that everything will be alright after suffering from any flooded area, then we suggest getting in touch with SERVPRO today.
Things that a water restoration company can do for you
11/29/2021 (Permalink)
Things that a water restoration company can do for you
When you have water damage in your home, it is very important to get the issue resolved quickly. This will help prevent mold and mildew from growing on wet surfaces around your house. If you need a water restoration company to come out and take care of this for you, here is what they might do:
Assess damage to belongings
They take a look around your home to see what might be ruined, including furniture and flooring materials. This helps you know how much restoration work needs to happen in order for things to go back to normal again.
Remove sopping carpets
They will take out any wet carpeting and get it dried in a way that prevents mold from growing on the fiber. In some cases, they may need to be replaced. This is only if the water damage was severe enough for this to happen. If not, then you can save some money on the restoration work.
Clean and sanitize surfaces
They will wash down any walls or other places where water damage happened to remove dirt, mildew, mold, bacteria and other germs that might cause illness for you or your family members if they are not killed through cleaning. Then, they leave everything to dry out in the open air for a while.
Fix any water damage that happened
If there was plumbing damage or some other type of issue, they can fix it right away so you don't have to worry about further problems with the house down the road when these issues are ignored. This is necessary if your home is going to be safe for you and your family.
Provide warranty on all work
They offer warranties for any restoration services they do, which means if anything goes wrong in the future then they will be able to come back and fix it for you.
Dehumidify the air to reduce moisture levels in your home
When you find out that there is a problem with water damage, it is important to take care of this as soon as possible. If it goes untreated for too long, then your house may start to smell bad or have mold growing on the surfaces. This is when you should call a water restoration company to come out and do the work for you in an urgent manner. They will be able to remove the standing water, which means that there won't be any more surface damage done or mold growing on your walls or furniture.
These are just some of the things that they might do for you when it is time to call in professionals. There are many other services out there as well so be sure to find out what else they can offer in addition to the ones mentioned above.
Identifying Causes of Water Damage Is Important
11/17/2021 (Permalink)
Identifying Causes of Water Damage Is Important
Water damage is one of the most common home disasters to occur. It can be caused by a number of factors, but often times it is due to improper maintenance or installation of plumbing fixtures. Preventing water damage begins with identifying the causes and implementing strategies that will help you avoid it in the future.
Leaking Roof
One of the most common causes of water damage is a leaking roof.
This can be caused by loose or missing shingles, worn out caulk around chimneys and skylights, or broken flashing where roofs meet walls. Whatever the cause might be you should always try to identify it as soon as possible in order to prevent further damage from happening. This includes taking note of how much time has passed since there was last heavy rainfall so that you have an idea about what kind of repairs need to happen during drier weather when trees lose their leaves and your house is less likely to get damaged again due to foliage contact with your home's exterior. Once any leaks are repaired immediately look for other potential areas where water may seep through the roof and check them as well.
Faulty Plumbing Fixtures
Another common cause of water damage is faulty plumbing fixtures like sinks, tubs, or toilets that are not properly installed. These can lead to water leakage behind walls which may result in rotting wooden studs , mildew underneath flooring materials, warped sub-floors , peeling paint on interior surfaces etc. If you suspect any issues with your home's plumbing be sure to have it inspected by a licensed plumber so they can repair it before mold sets in.
Outdoor Water Damage - Poor Drainage Systems
Leaks from outdoor faucets often go unnoticed for extended periods because people don't normally spend much time outside during rainstorms. The best way to prevent damage from occurring is by installing a water sensor in your garden or lawn. This will activate an automated sprinkler system that can help you extinguish any potential fires before they get out of control.
Appliances That Use Water
Another major cause of water damage is leaking appliances that use water like dishwashers, washing machines, or refrigerators.
If you suspect any issues with your appliances be sure to have them inspected by a licensed plumber so they can fix the issue before mold sets in. If you are not able to afford repairs on these things right away look for cheap alternatives online without sacrificing quality and effectiveness. For example, some people even find success using dryer sheets instead of laundry detergent when doing their clothes!
Rain and Floods
Another cause of water damage is rain and flooding. If your home happens to get flooded you should not try to clean it yourself. Instead, contact professional flood remediation services in order to prevent mold growth inside the house which can be extremely hazardous for both humans and pets alike. If there are no signs of mold than simply airing out any rooms that have been affected by flooding will suffice until repairs begin. It's important that you do not use space heaters or other electrical sources when doing this because they could create a fire hazard.
When it comes down to preventing water damage in your home, identifying the causes of water damage is half the battle. The other half involves taking steps towards resolving those problems as soon as possible so they do not become an even bigger issue than they already are.
When Should You Contact a Water Damage Restoration Company?
11/17/2021 (Permalink)
When Should You Contact a Water Damage Restoration Company?
If you’ve experienced water damage in your home, it can be hard to know where to start. Should you try to clean up the mess yourself? Call a plumber? Contact an insurance company? Get estimates from several restoration companies? The answer is that first and foremost, if there is standing water or significant amounts of water coming out of your pipes, contact a professional 24-hour emergency service ASAP. Once the immediate danger has been taken care of, call one or two reputable restoration companies for estimates on how much it will cost to get your home back into shape.
When should you call a water damage restoration company? You might be asking yourself that question because your basement flooded and the carpet is soaked or your washing machine overflowed and leaked into the kitchen. Not sure if you need to call a water damage restoration company? We're here to help! In this blog post, we'll discuss when it's time to contact a professional for assistance with water damages in your home so that you can reduce any long-term effects of these types of disasters.
When the Damage Is Too Much For You to Handle On Your Own
Sometimes the damage can be too much to handle for you on your own and you know you need a professional to get rid of your water problem. If the damage is too much for you to handle on your own, call a water damage restoration company immediately.
When You Have Standing Water or Pipes That Are Leaking
If there's standing water in your home or if there are pipes that have been compromised and are leaking, it's important that you contact a 24-hour emergency service as soon as possible so they can get out to your location ASAP. The longer the water sits inside of your walls or carpeting, the more likely it will be that mold will begin to grow and/or cause structural problems within the building itself. If this occurs, not only do you run a higher risk of developing health issues due to exposure to growths caused by mold spores but also having all this water damage repaired will be a lot more expensive.
When You Need a Fast Turnaround Time for Repairs to Your Home or Business
Not only is it important that you contact a professional as soon as possible, but you also want to find one who can offer same-day service or at least 24 hours’ notice of when they plan on arriving for repairs. The faster the turnaround time from the moment your call has been made until help arrives, the better off your home and property will be in terms of minimizing any further long-term effects after water damage occurs. Also keep in mind that if there are outlets or appliances which have been destroyed due to this occurrence, not calling a restoration company quickly enough could mean being without these vital amenities for quite some time.
The Benefits of Using a Professional Restoration Company amid Flood Damage
11/17/2021 (Permalink)
The Benefits of Using a Professional Restoration Company amid Flood Damage
Floods and water damage can be devastating for any home or business. There is a lot to consider, such as how much damage has been done and where the flood came from. If you are trying to clean up your property following a flood, it is important that you hire professionals who have experience with this type of work. A professional water restoration company will know how to extract standing water, dry out carpets/carpeting, remove mud from floors, and do mold remediation if necessary and more!
They Can Assess the Real Damage to Your Property
Floods can cause a lot of damage to your property, and it is important for you to have someone who knows what they are doing assess the situation. Water restoration professionals will know exactly how much water has been absorbed into all of your materials including floors, walls, carpets/carpeting and more! This way everything can be dried out efficiently in order to prevent further damages from occurring.
They Can Offer A Long Lasting Solution to Your Water Damage Problem
When there is water damage to your property, it can lead to mold growth and other problems. Instead of trying to fix the situation on your own with DIY methods that may not work long term, you should hire a professional restoration company who knows exactly what they are doing when it comes to getting rid of any standing water or debris left behind after floods! They will do all the dirty work for you so that everything looks fresh again without having to worry about potential damages in the future because you tried fixing things yourself.
They Know How to Clean Up After Flood Damage Easily and Effectively
Restoration companies have equipment at their disposal such as dehumidifiers, blowers/vacuums, moisture meter devices and more! This way everything can be dried out efficiently and effectively. They will also have the knowledge of how to remove standing water from all types of surfaces including carpet, hardwood flooring, concrete/tile floors and more! With this equipment they are able to extract any moisture that has been absorbed into your materials as well as dry up wet carpets which is a big part of restoring your home after having flooded.
They Can Help Prevent Mold Growth
One of the main problems with having flooded properties is that there tends to be standing water for days, weeks or even months at a time depending on where exactly you live. If not properly taken care of such as drying out carpets/carpeting and removing mud from floors then this could result in mold growth behind walls or other surfaces which nobody wants. You should always leave these types of concerns into the hands of professionals who are experienced in restoring properties after having flooded. They know exactly how to dry out carpets/carpeting, remove mud from floors and prevent mold growth so that your home is restored back to its pre-flood condition with ease!
They Can Help Restore Your Property Back To Its Pre-Flood Condition
After you have experienced flooding in your property it can be hard for some people to get their lives back on track because they are concerned about fixing the situation themselves or hiring a professional who may not do everything properly. If you hire professionals however, they will restore all of your materials such as walls, floors, furniture etc. Back to its pre-flood state without any problems whatsoever which makes life easier when trying to move past something like this!
They Will Make Sure Everything Is Done Professionally
Regardless of how severe your water damage is (whether it was caused by a burst pipe, broken washing machine or more) you should always hire professionals to restore your property back to its pre-flood condition. This way everything can be done efficiently and effectively without any problems along the way. They will also use quality materials when restoring anything in order for all surfaces such as walls/walls, floors/carpets etc. To look fresh again just like they did before having experienced flooding. In this case hiring a professional restoration company works wonders because they have experience with fixing properties after flooding which makes life so much easier afterward!
5 Immediate Steps to Handle a Water Damage Emergency
9/14/2021 (Permalink)
5 Immediate Steps to Handle a Water Damage Emergency
Water damage can be infuriating. It is classified as one of the most serious emergencies that your property could suffer from – one that could possibly have long-term implications as well.
There are many ways that your property could get damaged by water, such as a heavy storm, flash floods, extreme rainfall, damaged pipes, overflowing water appliances, or even a leaking roof. Regardless of where your water damage stems from, it is mandatory to address the problem immediately to prevent further damage and to allow for repair strategies to be helpful.
When you face a water damage emergency at home, you should already have a plan in place that tells you exactly how to handle the situation. Here are a few steps that should ideally be part of your contingency plan:
- Protecting Yourself
The reason why water damage is considered extremely serious is because not only will there be floating water around your home, but the water can also further create more emergencies around the house. If the water is contaminated, there can be serious health effects if you come into contact with it. If you let the water reach electrical appliances, there can be a short circuit in the house or lead to electrocuted water.
To protect yourself, the first step in a water damage emergency should be shut off all electricity in your home. In case the water damage is caused by flooding, it is important to evacuate the home and reach a safe destination ASAP. Remember to wear protective clothing such as gloves and boots when you come in contact with the water to avoid the risk of contaminated or electrocuted water. You should also protect important possessions first – including important documents and electronic devices.
- Stop the Damage
In order to prevent further damage to your property, it is important to identify the source of the water damage and stop it immediately. If you have a burst pipe, you can shut off the water supply. If there is a flood in the area, you can use sandbags to lessen the impact. If you are suffering a ceiling leak, you should identify the exact point of leakage and reach out to a roofing expert.
- Call the Insurance Company
Since most houses in the US are insured, it is important to call the insurance company as soon as you identify water damage on your property. They are likely to guide you regarding what to do next, including getting a claims adjuster and taking photographs of the property damaged. This step is important to save money on damage repair in the future since your insurance company is likely to have it covered.
- Dry Everything
If it is possible, you should begin drying your wet furniture and flooring as soon as possible. Leave your rugs out in the sun to dry and turn on the fans to help dry out the entire house. This step is essential to eliminate the possibility of mold growth on your property due to still water and moisture in the home.
Ways to Diagnose Water Damage in a Property
11/20/2020 (Permalink)
Ways to Diagnose Water Damage in a Property
Water damage is a collective term that is coined to refer multiple impairments that have occurred due to persistent water attacks on a system thus destroying the material through various destructive processes, for instance, decaying of wood, corrosion of steel, mold or bacterial growth and so forth. Thus water damage can be problematic if not diagnosed immediately in its early destructive stages but property owners usually tend to neglect the issue as they reckon it as a consequence of either defective plumbing or may be due to structural defects.
Water damage that we notice is nothing as compared to the internal damage that it has caused the foundations of your property since most water damage begins deep in the walls leading to structural loss hence this can only be repaired by the aid of a trained professional who will not only analyze the issue but will also repair it.
So, here is how we can diagnose if the property has been damaged by water or not:
Dark or Wet Water Blotches:
The first and foremost sign that you should be looking while detecting the water damage is the wet stains of water that are usually found on the walls or ceilings. These yellowish water circlets are very easy to identify as they are quite obvious.
Inflated Drywalls:
At times the dry walls of the house, building or any other property tend to absorb moisture that is present within the walls, due to which they get swollen or simply puff out, therefore, it is imperative to check every wall to inspect for the inflated walls. These inflated walls are another sign indicating severe water damage.
Crumbling Wooden Items:
The most vulnerable material to water damage is wood as the wood fibers tend to swell and shrink. They shrink when discharge water and swell when absorb it. Swollen wood is more liable to crack and crumble down if not fixed instantly, so if you are suddenly observing your wooden furniture or any other wood-based item fractured and swollen thus you need to get it fixed promptly before this water leakage is successful in dilapidating it.
Tattered Walls:
Tattered or run-down walls are another clue for water damage. Excessive moisture within the walls makes the paint clammy and damp thus slowly and gradually, the paint starts peeling off or in some areas, it bubbles out. So if you notice patched walls or discolored and bumping paint do not hesitate in calling water damage control department.
Mold and Bacterial Growth:
One major signal that screams "water damage" is the growth of molds, bacteria and other minute viable organisms on your property. Apart from damaging your stuff, they are also a threat to your health since they may pose some health effects. Mold and bacterial growth simply tell you that the water damage is severe and needs to be examined properly.
Some numerous signs and indications may signal for water damage, some can be easily identified like the dampness of the walls, fractured ceilings while some require a professional's expertise to resolve the matter for instance terrible exterior etc. whatever the cause is, water damage is an alarming issue that must not be left unnoticed.
Top 5 Causes Of Commercial Water Damage
11/20/2020 (Permalink)
Commercial water damage in your business can cause extensive damage. It can cause you to close your business for a while to restore the damage and this can end up causing you a lot of revenue. This is why it is important to understand what causes commercial water damage in the first place.
Once you understand these causes you can take steps to ensure that it doesn’t happen on your property because of these reasons.
#1. Damaged Pipes
This is the biggest cause of commercial water damage. Many factors contribute to the damage of pipes over time. This can include regular changes in pressure and freezing temperatures.
However, you can tell if there is pipe damage as there are signs. If you see water stains on your floor or ceilings or notice a musty smell in an area then this may be a sign that the pipes in your property are damaged.
It is important to call a professional if you see these signs so they can assess and give you an expert opinion.
#2. Roof Damage
Maintaining your roof is an essential part of maintaining your property. Damage on the roof can be caused by many factors such as harsh weather, rain, snow, and destructive winds.
This can cause structural damage and result in leaking water. If this is not detected early on then it can even lead to mold damage and other consequences that come with water damage.
You must regularly keep a check on your roof so that you can maintain it easily.
#3. Fault In Sprinkler Systems
These sprinkler systems have pipes as well that can be damaged which can result in a leak. Extensive leaks can cause water damage to commercial property. Some signs of such water damage include:
- Musty smell
- Wet walls
- Wet carpets
- Standing water
- Mold
These signs indicate that you may have a damaged sprinkler system. Call a professional and address it right away.
#4. Damaged Windows
Regular window maintenance should also be part of your maintenance routine. If the windows don’t have a proper seal or are damaged then water can come inside the commercial property.
Long-term exposure to this can lead to problems such as mold in the building. You have to ensure that all the windows in the property are sealed properly.
#5. Damaged HVAC System
As a business, it is important to provide your employees with a safe and thriving work environment. Part of that responsibility is to maintain clean HVAC systems. If that is not done then they can become damaged which will lead to water damage on the premises.
These are the top 5 causes of commercial water damage. Make sure to conduct regular maintenance so these problems can be prevented on your premises.
If there is any such damage then call SERVPRO now. Our experts will ensure professional and skilled restoration of your premises. For more information, feel free to get in touch with us now.
How To Prep Your Home For The Winter
11/17/2020 (Permalink)
Summers are over and fall is officially here. This means that the weather is going to get colder and you have to prepare your home to ensure warmth and safety. Here are some of the most important steps you can take to prep your home for the winter season.
#1. Seal Your Windows And Doors
It is important to notice small openings in your doors and windows and seal them before the winter season arrives. These openings let in chilly air in the winters that can make your house even colder. Apart from that, water can also seep in if it rains or snows.
So, make sure to fill all these gaps with mortar or silicone caulk so that no cold air or water can get inside your home. It will ensure your home stays warm and you can stay cozy.
#2. Clean Your Gutters
You can do this yourself or call a professional to do it instead. This is because gutters collect debris all year long. If they are not cleaned then water can back up. This can cause roof damage and water damage.
So, make sure that before the weather gets even colder you clean out all the gutters from your home. This will reduce the risk of floods and water leaks in your home during the winter season.
#3. Extend Your Downspout
Too much water can cause a lot of damage to the foundation of your property. This is why you should add extensions to your downspouts before the winter season. Doing so will ensure that the water runs three to four feet away from the foundation in your home.
In the long run, your foundation will be safe from water damage and your home will not be prone to leaks or flooding. Winters tend to bring rain and snow so an extension is an essential item you should have.
#4. Add Insulation To Your Attics And Basements
Insulation ensures that the warm air stays inside your home during the winter season. Attics and basements can tend to get colder than the rest of the house. This is why you should think about adding insulation to prep your home for the winter season.
However, you should not attempt to do this on your own. It is better that you call a professional. They will do it at a reduced cost and also do a skilled job. This way you will be able to enjoy the insulation for a long time to come.
So, if you have chilly basements or attics then it is time for some insulation.
We should adapt ourselves and our homes to the changes in the weather. Doing so ensures that we are living in a safe home that provides us with everything we need despite the weather.
If you want to prep your home for the winter season then get it done by our experts at SERVPRO. For more information about our services, feel free to get in touch with us now.
Impact of Water Damage On The Property Value
11/13/2020 (Permalink)
Have you ever confused the term "water damage" with life-threatening water associated natural catastrophes like flooding or hurricanes etc.? Well, this is very likely to happen, but the term water damage is not used in this context rather it is a term that describes multiple damages caused by water leakage on your property thus making it decrepit in many ways.
It is a very slow and profound kind of deterioration as water travels along parallel surfaces thus eliciting its effect bit by bit. The destruction takes place in places that you've never noticed before, usually occurring deep within the walls, floors and ceilings. Destruction due to water mainly happens due to faulty plumbing possibly due to corroded and dripping pipes and toilets in addition to this, it is visible and prominent in places like bathrooms, kitchen and even refrigerators thus opening doors for multiple issues like fractured and swollen walls, growth of molds, nasty smell, bumping and inflated paint etc.
Water damage has for sure negative impacts on the resale of the property and realtors or even property owners often face difficulties in making a sale deal for an already run-down property. One might think that what relation does water have with the property's value? This query is reasoned by stating fact that sellers generally highlight the pros and cons of the property when it is being sold having no clue about the destabilized foundations of the property chiefly done by the excessive water leakage until the new owner conducts the inspection and finds out about the declining state of the building.
Following are some ways through which water damage succeeds in lowering your house value:
Deflation in the price:
Water damage lowers your property's capital value as the price estimated for the restoration of the house is more as compared to its actual value thus whether you purchase a dilapidated property which is completely void from inside or you buy it and then spend large amounts of money on its restoration, Whichever the way is, you surely will be losing quite an amount of money.
Nil Electrical System:
Apart from making the property tattered, water damage disrupts the electrical layout of the building and a damaged electrical system is not only a threat to an individual's life but it further lowers the market value of the site.
Higher Chances of Re-occurrence:
A place that has been under the spell of water damage, might fall in the same pit again. This also makes buyers cautious once they are familiar with the problematic situation and ultimately your expectations of asking price are usually not met.
Water damage is more destructive than one can imagine and is brought into notice when the situation has aggravated tremendously. The control of water damage is a very expensive process as numerous problems need to be fixed for instance mold remediation, repairing of foundational and structural damages hence a lot of money is required for restoring a water damaged tumbled down mess to uplift its value.
Water Damage Restoration Tips And Tricks
11/13/2020 (Permalink)
Has your home or office experienced any water damage? Taking immediate action will only minimize the damage further. This is why you need to take action as soon as possible. Even though you need the services of experts in water damage remediation, there are many things that you can do yourself to minimize the loss. So, if your property has been damaged by water you need to follow some tricks and tips. Following these tips will ensure that the damage is minimized and will also ensure the safety of people present on the site. Want to know what these tips and tricks are? Keep reading then.
Dry Out The Affected Area
To minimize the damage, you must dry out the affected area as soon as possible. The presence of moisture in the affected area will only damage it further. This is why you need to be as thorough as possible. In smaller spaces, you can use fans to dry out the area affected by water. But, fans will not be effective in large spaces. So, if you need to dry out the larger space you can rent a large capacity dehumidifier.
Disinfect The Area
Once the area has been dried out and the damaged components have been removed, you need to disinfect the whole area before you start using it. Disinfecting the area is important so that the mold does not grow there. There are many ways through which you can disinfect the area but mostly bleach is used by the people. If you are not comfortable with using bleach, there are many other options that you can use instead.
Repair The Ceiling First
The ceilings that are damaged with water are riskier than other areas. This is why you need to repair them first or else they will collapse. If the damage is beyond control, you will need to remove the affected ceiling or boards. If it is repairable, then you can repair it as well. To repair the leaking ceiling, you must find the source of the leak first. Meanwhile, you need to make sure that the water does not cause any structural damage to your property.
Replace Damaged Wood
The wood that has been damaged by water will rot and develop mold on it. This is why it needs to be replaced as soon as possible. But, before replacing the damaged woods, you need to thoroughly clean the area beneath the wood. Also, you need to be careful about the placement as well and make sure that the structure has the right support.
Contact Professionals
The professionals can take of your damaged property in ways that you cannot do it yourself. So, if your property has been damaged by water, it is advisable that you avail the services of a professional company that can restore the place to its original form.
If your property has been damaged by water, you should take immediate action to restore the place back to its original form. It is an extremely important job that needs expert supervision. So, if you are looking for a team of professionals that would take care of your property, you must contact SERVPRO of Woodbury/Deptford and avail the professional services.
Cleaning the Gutters in Your Home Can Prevent Water Damage
9/9/2020 (Permalink)
Prevent Water Damage in with Fall Gutter Maintenance
Although we are used to the weather extremes in Minneapolis, our swings from summer’s hot and humid feel to the “Polar Vortex” in deep winter can be hard on our home’s systems and structure. Now that fall is firmly ensconced, and winter is on the way, make time to inspect your roof and its drainage configuration. Once winter’s frigid temperatures take hold, it is too late to prevent problems easily.
Why the Focus on Gutters and Drains?
Water damage in is not limited to the aftermath of burst pipes, appliance malfunctions, and severe storms. During the quiet and coziness of a gentle snowfall, your roof and the structural components of the upper levels of your home can be under attack. If ice dams form near the eaves and roof edges of your house, water can seep inside. You risk ice dam complications when warm air escapes at the joints between exterior walls and the roof, melting snow that deposits into the gutters. If your home's gutters experience clogging with leaves and debris, the water collects. Poorly attached or missing downspouts exacerbate the situation, and improperly canted gutters prevent drainage as well.
Slow, Steady, and Nearly Invisible Damage
The cycle of snow melting and freezing into ice dams eventually force moisture into your attic or highest level. Wood framing and insulation absorb the water, increasing the probability of mold growth and deterioration of the building materials. Throughout the winter, the water can migrate down and between the walls into living areas. Drywall or lath and plaster construction both experience significant damage over time. The smell of rapidly multiplying mold colonies or staining might be your first signal that months of substantial destruction have occurred without fanfare.
Maintenance Is the Key to Ice Dam Prevention
Cleaning gutters and securing downspouts is an autumn task that repays you many times over when the snow flies. A bonus is that a well-maintained gutter system also helps preserve the integrity of your home during spring showers and summer’s severe weather. Ensuring that the water running off the roof is far from your foundation prevents flooding and damage to exterior building materials. Sealing eaves and upgrading insulation also helps interrupt the melting and freezing cycle at the edge of your roof.
SERVPRO of Woodbury/Deptford is your partner if poorly draining gutters and downspouts cause water to head into your abode any time of the year. Contact us year-round at (856) 686-0100 for help with migrating water damage.
How to Prevent Frozen Pipes
11/19/2019 (Permalink)
Water has a unique property in that it expands as it freezes. This expansion puts tremendous pressure on whatever is containing it, including metal or plastic pipes. No matter the strength of a container, expanding water can cause pipes to break.
Pipes that freeze most frequently are:
Pipes that are exposed to severe cold, like outdoor hose bibs, swimming pool supply lines, and water sprinkler lines.
Water supply pipes in unheated interior areas like basements and crawl spaces, attics, garages, or kitchen cabinets.
Pipes that run against exterior walls that have little or no insulation.
How to Protect Pipes From Freezing
Before the onset of cold weather, protect your pipes from freezing by following these recommendations:
Drain water from swimming pool and water sprinkler supply lines following manufacturer's or installer's directions. Do not put antifreeze in these lines unless directed. Antifreeze is environmentally harmful, and is dangerous to humans, pets, wildlife, and landscaping.
Remove, drain, and store hoses used outdoors. Close inside valves supplying outdoor hose bibs. Open the outside hose bibs to allow water to drain. Keep the outside valve open so that any water remaining in the pipe can expand without causing the pipe to break.
Add insulation to attics, basements and crawl spaces. Insulation will maintain higher temperatures in these areas.
Check around the home for other areas where water supply lines are located in unheated areas. Look in the garage, and under kitchen and bathroom cabinets. Both hot and cold water pipes in these areas should be insulated.
Consider installing specific products made to insulate water pipes like a "pipe sleeve" or installing UL-listed "heat tape," "heat cable," or similar materials on exposed water pipes.
Consider relocating exposed pipes to provide increased protection from freezing.
How to Prevent Frozen Pipes
Keep garage doors closed if there are water supply lines in the garage.
Open kitchen and bathroom cabinet doors to allow warmer air to circulate around the plumbing. Be sure to move any harmful cleaners and household chemicals up out of the reach of children.
When the weather is very cold outside, let the cold water drip from the faucet served by exposed pipes. Running water through the pipe - even at a trickle - helps prevent pipes from freezing.
Keep the thermostat set to the same temperature both during the day and at night. By temporarily suspending the use of lower nighttime temperatures, you may incur a higher heating bill, but you can prevent a much more costly repair job if pipes freeze and burst.
If you will be going away during cold weather, leave the heat on in your home, set to a temperature no lower than 55° F.
ICE DAMS: Several quick fixes but only one cure.
11/19/2019 (Permalink)
ICE DAMS: Several quick fixes but only one cure.
An Ice Dam is a hump of ice that forms at the edge of a roof under certain wintertime conditions. An ice dam can damage both your roof and the inside of your home. It will put gutters and downspouts at risk too.
Ice Dams are a common sight in Northern New England winters, and Home Partners has dealt with quite a few. There are several things you can do to avoid getting an ice dam or to reduce the risk of damage after one has formed, but there’s really only one cure: a combination of better sealing, insulation, and venting in the attic and eaves.
HOW DO ICE DAMS FORM?
An ice dam forms when the roof over the attic gets warm enough to melt the underside of the layer of snow on the roof. The water trickles down between the layer of snow and the shingles until it reaches the eave of the roof, which stays cold because it extends beyond the side of the house. There, the water freezes, gradually growing into a mound of ice.
The flatter the pitch of the roof, the easier it is for an ice dam to get a grip. Gutters at the eaves can also trap snow and ice. If snow and ice build up high enough in the gutter, it can provide a foundation for an ice dam.
WHAT DAMAGE DO ICE DAMS CAUSE?
When an ice dam gets big enough, melted water backs up behind it and seeps underneath the shingles. Eventually, it will drip into the insulation and down into the ceilings and exterior walls beneath the eave, ruining sheetrock and paint. If the ice dam breaks free, it can pull shingles and gutters off with it, and it will damage anything it falls on: shrubs, windowsills, cars, pets, and people. If the roof sheathing stays wet, it can form mildew and start to rot
DEALING WITH EXISTING ICE DAMS
1. Remove the ice dam by breaking it free in small chucks. Do NOT use an ax or other sharp tool! You’ll cut through the shingles. Instead, tap lightly with a blunt mallet. This is slow, dangerous work, so hire someone experienced at roofing. Even if you do it safely, the chunks of ice can take pieces of shingle with them.
2. Clear out gutters and downspouts. Again, this is ladder work and an easy way to damage either plastic or metal gutters and spouts.
3. Melt troughs through the ice dam with calcium chloride ice melter. Do NOT use rock salt! It will damage paint, metals, and plants beneath the eave and wherever the salty water drains.
A good trough-maker is a tube of cloth (a leg from an old pair of panty hose works well). Fill it with calcium chloride, tie off the top, and lay it vertically across the ice dam. It will slowly melt its way down through the dam, clearing a path for the underlying water to flow free.
Refrigerator Water Line and Drain Hose Leaks...Prevention Tips!
11/18/2019 (Permalink)
The refrigerator is one of the hardest working appliances around the home, so when one breaks down or suffers a leak, the experience can have consequences. If you find that your fridge’s water line has a leak, there are a few simple steps you can follow to troubleshoot the problem and have it running again in no time.
What To Do When Your Refrigerator Water Line LeaksThe first step is to identify the leak. The refrigerator water line connects the household water supply to a refrigerator with an ice maker or water dispenser. The water line typically runs at the back of the fridge. Once the leak has been identified, here is what you can do to fix the problem.
- Turn off the valve that supplies water to the refrigerator and then unplug the refrigerator to turn off the appliance. You will likely find the water shut off valve located beneath the kitchen sink or in some cases, behind the refrigerator itself.
If the valve is located behind the fridge, carefully pull the appliance away from the wall and turn off the valve.
You will now have to loosen the compression nut that secures the supply line to the water intake valve. This can be done with the assistance of an adjustable wrench by turning the nut counter clockwise and then disconnecting the supply line.
Once loosened, remove the compression nut to disconnect the supply line from the valve.
If the supply line is broken or torn in places, replace the old line with a new one making sure that its length and dimensions are the same as the original water line. Material choices range between copper, plastic and stainless steel water lines.
- To fix the new water line in place, thread one end of the supply line to the shut off valve under the sink and tighten until it is snug in place. When using a copper or plastic line, make sure to first slide on a compression nut secured with a compression sleeve or ring onto the end of the line. A stainless steel water line comes with a built in rubber gasket that stops the connection from leaking.
- Thread the other end of the supply line to the water intake valve and tighten it until snug.
- Turn on water and check for any leaks. If there is still a drip, tighten the nuts a bit more.
Purchasing a new water line
When the line is badly damaged and needs replacement there are a few things to keep in mind. For instance, one of the factors at this point would be to choose a line material that will offer durability and long lasting utility. Another is the price tag attached to the new purchase.
Plastic water lines
In terms of materials, plastic lines are the most cost effective but also least durable. The biggest threat lies in these lines cracking, clogging or leaking, causing water damage. While plastic lines may seem to work well in terms of flexibility, especially where space behind the fridge is tight, many people do not prefer this type of line material.
Copper water lines
Another option is to go with copper water lines that yield superior sturdiness but are also more prone to kinkiness. A more flexible version of copper lines is available to allow pushing the tubing into position giving it some flexibility to work well in cramped spaces.
Stainless steel water lines
As an alternative stainless steel braided lines can be considered. Braided steel is a tough, non-kinking option to the more pliable plastic and the ¼ in flexible copper lines. Stainless steel also happens to be the most durable option but will tend to be the most expensive as well.
Whether the leak in your refrigerator water line is caused by a plastic, copper or stainless steel water line, remember that you can always access the professional service of our experts at Tidal Wave in Atlanta to come and resolve all water damage concerns at your home.
Time is Crucial When it Comes to Water Damage
11/15/2019 (Permalink)
A Fast Response Is Crucial
In many cleaning and restoration situations, immediate action is needed. With over 1,700 U.S. and Canadian Franchise locations, SERVPRO is strategically positioned to be faster to any size emergency.
An immediate response helps to minimize the damage and the cleaning and restoration costs.
Water is particularly invasive, quickly spreading throughout your property and being absorbed into floors, walls, furniture, etc. SERVPRO Franchise Professionals arrive quickly and start the water extraction process almost immediately.
Water Damage Timeline
Within Minutes:
- Water quickly spreads throughout your property, saturating everything in its path.
- Water is absorbed into walls, floors, upholstery, and belongings.
- Furniture finishes may bleed, causing permanent staining on carpets.
- Photographs, books, and other paper goods start to swell and warp.
Hours 1 - 24:
- Drywall begins to swell and break down.
- Metal surfaces begin to tarnish.
- Furniture begins to swell and crack.
- Dyes and inks from cloth and paper goods spread and stain.
- A musty odor appears.
48 Hours to 1 Week:
- Mold and mildew may grow and spread.
- Doors, windows, and studs swell and warp.
- Metal begins to rust and corrode.
- Furniture warps and shows signs of mold.
- Paint begins to blister.
- Wood flooring swells and warps.
- Serious biohazard contamination is possible.
More Than 1 Week:
- Restoration time and cost increase dramatically; replacing contaminated materials and structural rebuilding may be extensive.
- Structural safety, mold growth, and biohazard contaminants pose serious risks to occupants.
Use Food Coloring to Diagnose a Water Leak in the Toilet Tank
11/15/2019 (Permalink)
If you have a heavy leak in your toilet, it's easy to diagnose—the faint sound of the toilet tank constantly replenishing is a dead give away. What about a slow leak? Diagnose it with food coloring.
If you have a slow leak in your toilet tank, hundreds of gallons are just slowly and silently cascading down the side of your toilet bowl every month. Fortunately you can easily detect if the uptick in your water bill is from a slow leak or not.
A simple test for toilet water leaks, place a half dozen or so drops of food coloring in the toilet tank. Leave the toilet alone for a half hour or more. Come back and check to see if the water in the bowl of the toilet has become tinted with the food-coloring dye from the tank. If it has, you've got a leak between the tank and the bowl.
How to check your toilet for leaks
- Remove the toilet tank lid.
- Drop one dye tablet or 10 drops of food coloring into the tank. (Dye tablets are often available for free through local water Providers.
- Put the lid back on. Do not flush.
- Wait at least 10-15 minutes, and then look in the bowl. If you see colored water, you have a leak. If not, you don't.
Basement Water Issues, Sump Pump Malfunctions, and Water Damage
11/15/2019 (Permalink)
Standing water on the floor is easy to see. Less obvious signs of problems include:
Unexpected increases in your water bill
- Stains on walls, floors or ceilings
- Damaged or warped flooring
- Warped bottom panels in under-sink cabinets
- Peeling paint or wallpaper
- Corrosion on plumbing valves and fittings
Deal with problems as you find them. Clean up any water or moisture, locate the source and make repairs. Tracking down a leak isn't always straightforward — water can travel along components in the building structure, so the indications of the leak may be in a different part of the home than the leak itself. If necessary, contact a professional roofing contractor, plumber or water damage restoration specialist to help with identification and repair.
In addition to the damage that water causes, it can encourage the growth of mold on walls and floors — where it's readily visible — and in ductwork, attics and crawl spaces — where you might not notice it. A musty odor is a sign that mold may be present.
If the affected area is larger than 3 feet by 3 feet, the Environmental Protection Agency recommends you find a professional mold remediation contractor. For smaller areas, you can clean nonporous surfaces with commercial cleaning products, soap and water or a solution of a cup of bleach to each gallon of water. Follow the instructions and safety precautions for the cleaning product you use and wear appropriate safety gear. Porous surfaces such as drywall need to be replaced. For more information on mold in the home and how to clean it up
Inspecting common sources of water leaks and taking some simple preventative measures can be an effective way to reduce the risk of water damage and mold.
Plumbing
- Every 6 to 12 months, inspect water lines, shut-off valves and fittings for fixtures such as sinks, toilets and tubs and for appliances such as washing machines, dishwashers and ice makers. Check for cracks, loose connections, kinks and corrosion. If you find a leak, turn off the water to the fixture or appliance until you can make repairs.
- Check around toilets to make sure water is not leaking at the base — an indication that the wax ring between the toilet and floor might need replacing or that there might be a crack in the base.
- If the temperature drops near the 20°F mark, allow faucets connected to vulnerable pipes — those not protected in insulated spaces — to drip. This helps minimize the risk of burst pipes by relieving pressure if the pipes freeze.
Appliances
- Replace washing machine supply hoses at least every five years. Consider using stainless-steel mesh hoses. Keep the machine properly balanced — over time, an unbalanced machine can move, pulling free the hose connections.
- Consider turning off the water to the washing machine when it's not in use.
- Don't operate a dishwasher or washing machine while your house is unoccupied.
- Follow the manufacturer-specified maintenance for your appliances, including your water heater. Have the water heater inspected every couple of years.
Roof and Gutters
- Have your roof inspected every three years by a professional, but also check routinely for damage you can see from the ground — such as broken and missing shingles or damaged flashing. A poorly maintained roof can lead to leaks in the home and additional damage to the roof itself.
- If your roof doesn't have a drip edge or drip cap, consider having one added. This component helps keep water away from the roof deck and directs runoff into gutters.
- Keep gutters clear and well-maintained. Gutters that overflow, leak or don't drain properly allow water to seep into your roof and into your foundation, crawlspace or basement.
- Make sure gutter downspouts direct rainwater away from the home's foundation. Use extensions to carry water at least 6 feet from the house.
Exterior Walls and Foundation
- Inspect the exterior of your home. Caulk around gaps at plumbing and ventilation entry and exit points.
- Check to see if roots from shrubs near your home have caused damage that can allow water to enter the foundation. You may need to remove shrubs that are close to the house to prevent problems. Roots can also damage and block in-ground pipes, causing leaks near the foundation and sewer backups in the home.
- Keep shrubbery beds and other landscape features sloped to direct water away from the home.
- Look for evidence of erosion or settling at the foundation that can indicate water problems.
Additional Tips to Avoid Water Damage
- Have your attic ventilation and insulation inspected annually and seal gaps that allow warm air into the attic — such as those around access doors and light fixtures. When warm air collects in the attic, it can lead to the formation of an ice dam — ice around the eaves that causes water from melting snow and ice to back up under the shingles and leak into your home.
- If you have a sump pump, test it several times during the year. Follow the manufacturer's maintenance instructions.
- Check your water pressure with a pressure gauge; typically these screw onto a hose bib. The pressure in an average home is around 50 to 70 pounds per square inch (psi). Higher pressure causes extra stress on pipes and fittings and can lead to leaks.
- Inspect tile and grout around showers and tubs. Make any necessary repairs.
- Check for leaks around windows during rains and seal any you find.
- Use exhaust fans in the kitchen and bathroom to move excess moisture out of the house. Moisture in the air can condense on cool surfaces and cause problems.
- Locate your water shut-off valve so you can quickly turn off water to the home in an emergency
Fire and Water Damage Restoration Companies, Have Standards
11/12/2019 (Permalink)
Fire and water damage restoration are essential services that protect families and their homes from severe issues. Whether it’s bad wiring, a flood, or a burst pipe, these professionals are capable of making the home safe to live in again. But getting it back to that state takes some real expertise and manpower, and it’s the kind of expertise that a certified firm can provide the best. There are serious health implications involved as well, so a homeowner wouldn’t want anyone else handling the job.
Why should a homeowner only consider a certified firm for fire and water damage restoration?
Floods and flames produce an immediate threat, and of course families are going to be pressed by the imminent danger, but these disasters can cause long-term problems as well. Pools of contaminated water, like those left behind by a storm or sewage backflow, are infested with a variety of pathogens and are also catalysts for explosive microbial growth. Molds, in particular, are common organisms found in the wake of contaminated moisture, and can take root in the home in as little as 48 hours if the problem is not dealt with by then. Mold is a significant concern, especially for families with young children, as it can cause lingering respiratory and behavioral complications. Mold can also spread quickly if it is given the chance to release airborne spores.
Flames leave behind a different kind of pest. Ash is a copious byproduct of burned out material, and it is both light and acidic. This means it can easily be swept up by air currents in the home and settle on a variety of items it can damage. If it is not cleaned up right away, it will begin etching glass, corroding metal, and discoloring drywall and porcelain. Ash can also irritate the throat, nose and lungs, inflaming conditions like asthma and allergies. This will happen over a matter of days, so a prompt response is required to stop it in its tracks.
Fire and water damage restoration firms are qualified to halt and reverse the spread of molds, ash, and other hazards. Given the time-sensitive nature of their work, reputable crews are normally available around the clock and can begin work immediately. A certified firm, one that has been trained by an organization like the Institute of Inspection, Cleaning and Restoration Certification (IICRC), will have the tools and methods needed to make the home safe to live in again. With proper training, professionals will be able to quickly establish a workspace inside the home, drain the excess water, and eliminate debris caused by the disaster. Over the next several days, they can set up equipment to expedite the drying process, saving any materials they can that have been exposed to water, or wash away ash residue, which has a tendency to get everywhere. These professionals can also inspect the building thoroughly for common trouble areas and confirm that there is no lingering moisture or ash hiding in wait.
By the time a certified firm has completed their work, the building will be transformed back to its original state, waiting for the family to settle back in and continue their lives.
Refrigerator Water Line Detection and Tips!
11/11/2019 (Permalink)
The refrigerator is one of the hardest working appliances around the home, so when one breaks down or suffers a leak, the experience can have consequences. If you find that your fridge’s water line has a leak, there are a few simple steps you can follow to troubleshoot the problem and have it running again in no time.
What To Do When Your Refrigerator Water Line Leaks
The first step is to identify the leak. The refrigerator water line connects the household water supply to a refrigerator with an ice maker or water dispenser. The water line typically runs at the back of the fridge. Once the leak has been identified, here is what you can do to fix the problem.
- Turn off the valve that supplies water to the refrigerator and then unplug the refrigerator to turn off the appliance. You will likely find the water shut off valve located beneath the kitchen sink or in some cases, behind the refrigerator itself.
If the valve is located behind the fridge, carefully pull the appliance away from the wall and turn off the valve.
You will now have to loosen the compression nut that secures the supply line to the water intake valve. This can be done with the assistance of an adjustable wrench by turning the nut counter clockwise and then disconnecting the supply line.
Once loosened, remove the compression nut to disconnect the supply line from the valve.
If the supply line is broken or torn in places, replace the old line with a new one making sure that its length and dimensions are the same as the original water line. Material choices range between copper, plastic and stainless steel water lines.
- To fix the new water line in place, thread one end of the supply line to the shut off valve under the sink and tighten until it is snug in place. When using a copper or plastic line, make sure to first slide on a compression nut secured with a compression sleeve or ring onto the end of the line. A stainless steel water line comes with a built in rubber gasket that stops the connection from leaking.
- Thread the other end of the supply line to the water intake valve and tighten it until snug.
- Turn on water and check for any leaks. If there is still a drip, tighten the nuts a bit more.
Purchasing a new water line
When the line is badly damaged and needs replacement there are a few things to keep in mind. For instance, one of the factors at this point would be to choose a line material that will offer durability and long lasting utility. Another is the price tag attached to the new purchase.
Plastic water lines
In terms of materials, plastic lines are the most cost effective but also least durable. The biggest threat lies in these lines cracking, clogging or leaking, causing water damage. While plastic lines may seem to work well in terms of flexibility, especially where space behind the fridge is tight, many people do not prefer this type of line material.
Copper water lines
Another option is to go with copper water lines that yield superior sturdiness but are also more prone to kinkiness. A more flexible version of copper lines is available to allow pushing the tubing into position giving it some flexibility to work well in cramped spaces.
Stainless steel water lines
As an alternative stainless steel braided lines can be considered. Braided steel is a tough, non-kinking option to the more pliable plastic and the ¼ in flexible copper lines. Stainless steel also happens to be the most durable option but will tend to be the most expensive as well.
Whether the leak in your refrigerator water line is caused by a plastic, copper or stainless steel water line, remember that you can always access the professional service of our SERVPRO of Woodbury/Deptford to come and resolve all water damage concerns at your home.
Water Damage in Your Property?
11/7/2019 (Permalink)
Water damage describes a large number of possible losses caused by water intruding where it will enable attack of a material or system by destructive processes such as rotting of wood, growth, rusting of steel, de-laminating of materials such as plywood, and many others.
The damage may be imperceptibly slow and minor such as water spots that could eventually mar a surface, or it may be instantaneous and catastrophic such as flooding. However fast it occurs, water damage is a major contributor to loss of property.
An insurance policy may or may not cover the costs associated with water damage and the process of water damage restoration. While a common cause of residential water damage is often the failure of a sump pump, many homeowners’ insurance policies do not cover the associated costs without an addendum which adds to the monthly premium of the policy. Often the verbiage of this addendum is similar to "Sewer and Drain Coverage".
Those individuals who are affected by wide scale flooding may have the ability to apply for government and FEMA grants through the Individual Assistance program. On a larger level, businesses, cities, and communities can apply to the FEMA Public Assistance program for funds to assist after a large flood. For example, the city of Fond du Lac Wisconsin received $1.2 million FEMA grant after flooding in June 2008. The program allows the city to purchase the water damaged properties, demolish the structures, and turn the properties into public green space.
Water Moisture - Type of Moisture Meters
9/6/2019 (Permalink)
Moisture meter is an essential instrument used in many industries to detect moisture content in materials. Home and building inspectors rely on moisture meters to identify potential problems and damage to structures from moisture buildup. Woodworking industries, such as furniture makers, use wood moisture meters to insure a quality product. Flooring contractors use moisture meters to determine ideal conditions when installing a floor over a concrete slab or sub-floor.
Indicator scales on moisture meters can vary in appearance, but all will indicate moisture content in percent (%MC). While some moisture meters offer an analog scale, others read %MC digitally. The accuracy of the %MC readings, as well as the appropriate substrate scales, varies per meter and can vary by brand and type.
Most moisture meters are calibrated to wood, which provides a relatively accurate reading in wood moisture content. Typically, this scale ranges in the 5 to 40% range. When testing the moisture content in non-wood materials, such as concrete, a relative scale of 0 to 100 is often used, where 0 is bone dry and 100 is saturated. This is a relative scale. Moisture meters include visual LED indicators related to the percent reading on the scale for dry, moderate and saturated or wet readings. Additionally, some meters also offer a third scale for readings of gypsum. These scale readings can range from 0.2 to 50% moisture content. When selecting a moisture meter for sheet rock, it is advised that a moisture meter that offers a scale reading for gypsum be used.
Color indicators on moisture meters are helpful in determining whether the material being tested is considered dry or if there is a potential problem with moisture. The green (dry), yellow (moderate) and red (high) indicators typically identify where on the scale of %MC the readings occur. This can clear up confusion where one interprets a %MC as dry versus one that is moderate and may require more thorough investigation to determine if a problem with moisture in the material exists, especially if a visible sign of moisture does not exist.
Types of Moisture Meters
There are three common types of moisture meters used for the inspection of building and structure materials: pin-type, pin-less and pin/pin-less/all-in-one. All three types of moisture meters offer specialized purpose and are unique to the end user's application in determining %MC in materials.
Pin-Type Moisture Meter
The first of the three types of moisture meters is the pin type. Pin-type moisture meters measure %MC at the depth of the head of the contact pins. Pin-type moisture meters have two pins on the instrument, which are used to penetrate into the test surface at a desired depth. The reading of %MC is determined by measuring the electrical resistance between the tips of the two pins. This method of inserting pins into a surface is often viewed as an invasive process for measuring %MC. Typically these moisture meters will read up to 5/16" depth.
Pin-type moisture meters use the principle of electrical resistance to measure the moisture content in materials by measuring the conductivity between the pins. The tips of the pins are relatively sharp, uninsulated and penetrate into the surface for a sub-surface reading. With pin-type meters, you can also obtain a reading by touching the pins to the surface for testing. Most pin-type moisture meters use a scale calibrated to wood, however this does not mean that the meter cannot be used to measure moisture in other substrates and materials. This type of moisture meter can also be used for, but is not limited to, concrete, drywall, ceiling tiles and painted surfaces. When using the wood scale on a pin-type moisture meter, the %MC reading can range from 5% to 40% in moisture content. Generally, the low end of this reading falls into the 5 to 12% range, the moderate range will be 15 to 17%, and the high or saturated range will read above 17%. Scales for MC% ranges are provided in the instrument instructions and should be consulted concerning measuring ranges for particular surface materials.
Pin-type moisture meters are useful in measuring %MC in wood flooring, drywall, painted surfaces (such as the exterior of the home), carpeting, ceiling tile and cement. A pin-type moisture meter is the best way to identify the exact location of moisture buildup. A pin-type meter uses two pins that penetrate into the test surface at the user’s desired depth. When insulated contact pins are used, only the uncoated tips are exposed, providing an accurate reading of moisture content at various levels of penetration. Pin-type meters are the only instruments that allow the inspector to identify exact location of moisture at a given point. Using a pin-type meter is an effective way to determine the difference between shell and core moisture content. In some cases, the depth of the reading exceeds the length of the pin on the meter. If this is the case, many meters are equipped with a connection option to add accessory probes that can be inserted further into a substrate for more accurate core or depth detection. An example would be for Exterior Insulated Finish Systems (EIFS) testing.
Pin-less Moisture Meter
Pin-less or noninvasive moisture meters operate on the principle of electrical impedance.
This meter provides a nondestructive measurement of moisture in wood and other substrates, such as concrete and gypsum. A noninvasive moisture meter may also be called a nondestructive or a pin-less moisture meter. Scales on these meters are similar to that of pin-type meters, where the wood scale reads %MC at 5 to 30%, and non-wood materials' %MC is read on a relative scale of 0 to 100%.
Pin-less moisture meters are commonly used to determine moisture content on a relative scale of 0-100% in concrete sub-floors and flooring prior to laying a wood floor or other decorative flooring surface. Other common uses for a pin-less moisture meter for identifying possible moisture buildup behind bathroom/shower tiles, under vinyl flooring and other finished surfaces, as well as to determine if water-borne finishes are adequately dry prior to second application.
Pin-less moisture meters are capable of reading up to a typical depth of 3/4" or 1" into a subsurface. These are useful for detecting problem moisture buildup where visual indicators are nonexistent.
Pin/Pin-less/All-in-One Moisture Meter
A third and possibly more useful moisture meter would be a pin/pin-less/all-in-one moisture meter. This type of moisture meter utilizes both methods for measuring %MC in surfaces. Because this type of meter offers the option to measure moisture content in substrates using both methods of reading moisture, one meter may be able to identify problem areas and then also be used to pinpoint the exact location where moisture damage or buildup is occurring. Essentially, this type of meter would utilize the same scales of %MC for wood and non-wood substrates and allow the end user the versatility necessary for a full inspection in determining areas where moisture is an issue.
Ideally, due to its diversity, this type of meter could be utilized by the flooring specialist, IAQ specialist, general contractor and home/building inspector.
Water Damage is a Scary Thing
5/9/2019 (Permalink)
Water damage is a scary thing, especially since often times we don’t even know that there is water damage happening until long after the fact. Take, for example, water damage caused by a leaky refrigerator. Because the fridge blocks your view of the wall and floor behind the unit, you won’t notice water damage is occurring unless the leak creates a visible puddle.
How to Repair Water Damage from a Refrigerator
The repairs will depend highly on the extent of the water damages. If the water has only recently been there, chances are that you can mop it up and air out the surfaces. Once dry, flooring should return to normal. You’ll want to make sure that the walls are adequately dried as well, since this will prevent mold growth.
If your fridge has caused water damages over a long period of time, however, you’ll likely need to have the flooring and drywall completely ripped out and replaced. This is where things get costly. Because mold is also a serious possibility, we recommend that you leave the job of assessing and repairing the damages to the professionals at SERVPRO of Woodbury/Deptford.
How to Repair Water Damage from a Refrigerator
5/8/2019 (Permalink)
Water damage is a scary thing, especially since often times we don’t even know that there is water damage happening until long after the fact. Take, for example, water damage caused by a leaky refrigerator. Because the fridge blocks your view of the wall and floor behind the unit, you won’t notice water damage is occurring unless the leak creates a visible puddle.
The repairs will depend highly on the extent of the water damages. If the water has only recently been there, chances are that you can mop it up and air out the surfaces. Once dry, flooring should return to normal. You’ll want to make sure that the walls are adequately dried as well, since this will prevent mold growth.
If your fridge has caused water damages over a long period of time, however, you’ll likely need to have the flooring and drywall completely ripped out and replaced. This is where things get costly. Because mold is also a serious possibility, we recommend that you leave the job of assessing and repairing the damages to the professionals at SERVPRO of Woodbury/Deptford.
What to Do When Your Refrigerator Water Line Leaks
11/20/2018 (Permalink)
The refrigerator is one of the hardest working appliances around the home, so when one breaks down or suffers a leak, the experience can have consequences. If you find that your fridge’s water line has a leak, there are a few simple steps you can follow to troubleshoot the problem and have it running again in no time.
What To Do When Your Refrigerator Water Line Leaks
The first step is to identify the leak. The refrigerator water line connects the household water supply to a refrigerator with an ice maker or water dispenser. The water line typically runs at the back of the fridge. Once the leak has been identified, here is what you can do to fix the problem.
- Turn off the valve that supplies water to the refrigerator and then unplug the refrigerator to turn off the appliance. You will likely find the water shut off valve located beneath the kitchen sink or in some cases, behind the refrigerator itself.
If the valve is located behind the fridge, carefully pull the appliance away from the wall and turn off the valve.
You will now have to loosen the compression nut that secures the supply line to the water intake valve. This can be done with the assistance of an adjustable wrench by turning the nut counter clockwise and then disconnecting the supply line.
Once loosened, remove the compression nut to disconnect the supply line from the valve.
If the supply line is broken or torn in places, replace the old line with a new one making sure that its length and dimensions are the same as the original water line. Material choices range between copper, plastic and stainless steel water lines.
- To fix the new water line in place, thread one end of the supply line to the shut off valve under the sink and tighten until it is snug in place. When using a copper or plastic line, make sure to first slide on a compression nut secured with a compression sleeve or ring onto the end of the line. A stainless steel water line comes with a built in rubber gasket that stops the connection from leaking.
- Thread the other end of the supply line to the water intake valve and tighten it until snug.
- Turn on water and check for any leaks. If there is still a drip, tighten the nuts a bit more.
Purchasing a new water line
When the line is badly damaged and needs replacement there are a few things to keep in mind. For instance, one of the factors at this point would be to choose a line material that will offer durability and long lasting utility. Another is the price tag attached to the new purchase.
Plastic water lines
In terms of materials, plastic lines are the most cost effective but also least durable. The biggest threat lies in these lines cracking, clogging or leaking, causing water damage. While plastic lines may seem to work well in terms of flexibility, especially where space behind the fridge is tight, many people do not prefer this type of line material.
Copper water lines
Another option is to go with copper water lines that yield superior sturdiness but are also more prone to kinkiness. A more flexible version of copper lines is available to allow pushing the tubing into position giving it some flexibility to work well in cramped spaces.
Stainless steel water lines
As an alternative stainless steel braided lines can be considered. Braided steel is a tough, non-kinking option to the more pliable plastic and the ¼ in flexible copper lines. Stainless steel also happens to be the most durable option but will tend to be the most expensive as well.
Whether the leak in your refrigerator water line is caused by a plastic, copper or stainless steel water line, remember that you can always access the professional service of our experts at Tidal Wave in Atlanta to come and resolve all water damage concerns at your home.
Water Damage From a Faulty Roof
11/20/2018 (Permalink)
Check for damage in the roofing material directly above where the leak is coming in. This will likely be easier to find on a flat roof, but leaks can also come into the house a good distance from where the actual roof damage is located. If your roof is slanted, inspect areas on the roof that are higher than where the leak enters the home.
If you have an attic, inspect it with a flashlight for water stains, black marks or mold.
Run a hose along different sections of the roof and have a person inside alert you when leaking occurs.
Look for damaged, curled or missing shingles near where the leak is coming in. Look closely for exposed roofing tacks, too.
Straighten out shingles that are curled back. In colder weather, this might require that you soften the shingle edge with heat, such as an electric hair dryer. Using a torch or other open flame heat source isn't recommended since asphalt shingles may be flammable, and regardless of whether they are flame retardant or not, excess heat will ruin the shingle.
Reattach curled-back shingles after straightening with a generous amount of asphalt roof cement or compound around the exposed edges.
Replace damaged shingles. If the shingle lifts off the roof with little effort, breaks, or simply crumbles, it needs to be replaced. Remove the old shingle by lifting its edges and prying out the nail.
Scrape the area underneath it to remove any leftover roofing cement.
Use a sharp utility knife to round the back corners of the new shingle slightly.
Slide the new shingle into place and drive 1 1⁄4 inch (3.2 cm) galvanized roofing nails into each upper corner, then cover the nail heads with roof cement.
Inspect for cracks or blisters in the roofing material.
Mend the blisters. Cut a line through the middle of the blister with a utility knife, but do not cut the sound roofing felt {substrate) underneath. Squeeze out or soak up any water inside the blister. The area needs to be completely dry.
Spread a generous amount of roofing cement under the loose roofing material and press down.
Drive galvanized roofing nails along each side of the repaired blister.
Inspect areas where surfaces connect, such as a chimney or vent pipe.
Look for damage to the caulking, and reapply caulk where necessary.
Remove damaged or deteriorated caulking so the new application can bond to the roof or flashing surface.
Use a putty knife to remove the loosened old caulk.
Clean and dry the area.
Cut the tip off the caulk tube and spread a bead along the same line, working it into the crack with an applicator. Let it dry.
Larger-scale repairs will be necessary if there is damage to the flashing around the chimney or the boots around vents, as these features may need to be replaced.
Tips to Avoid Water Damage
11/20/2018 (Permalink)
Standing water on the floor is easy to see. Less obvious signs of problems include:
Unexpected increases in your water bill
- Stains on walls, floors or ceilings
- Damaged or warped flooring
- Warped bottom panels in under-sink cabinets
- Peeling paint or wallpaper
- Corrosion on plumbing valves and fittings
Deal with problems as you find them. Clean up any water or moisture, locate the source and make repairs. Tracking down a leak isn't always straightforward — water can travel along components in the building structure, so the indications of the leak may be in a different part of the home than the leak itself. If necessary, contact a professional roofing contractor, plumber or water damage restoration specialist to help with identification and repair.
In addition to the damage that water causes, it can encourage the growth of mold on walls and floors — where it's readily visible — and in ductwork, attics and crawl spaces — where you might not notice it. A musty odor is a sign that mold may be present.
If the affected area is larger than 3 feet by 3 feet, the Environmental Protection Agency recommends you find a professional mold remediation contractor. For smaller areas, you can clean nonporous surfaces with commercial cleaning products, soap and water or a solution of a cup of bleach to each gallon of water. Follow the instructions and safety precautions for the cleaning product you use and wear appropriate safety gear. Porous surfaces such as drywall need to be replaced. For more information on mold in the home and how to clean it up
Inspecting common sources of water leaks and taking some simple preventative measures can be an effective way to reduce the risk of water damage and mold.
Plumbing
- Every 6 to 12 months, inspect water lines, shut-off valves and fittings for fixtures such as sinks, toilets and tubs and for appliances such as washing machines, dishwashers and ice makers. Check for cracks, loose connections, kinks and corrosion. If you find a leak, turn off the water to the fixture or appliance until you can make repairs.
- Check around toilets to make sure water is not leaking at the base — an indication that the wax ring between the toilet and floor might need replacing or that there might be a crack in the base.
- If the temperature drops near the 20°F mark, allow faucets connected to vulnerable pipes — those not protected in insulated spaces — to drip. This helps minimize the risk of burst pipes by relieving pressure if the pipes freeze.
Appliances
- Replace washing machine supply hoses at least every five years. Consider using stainless-steel mesh hoses. Keep the machine properly balanced — over time, an unbalanced machine can move, pulling free the hose connections.
- Consider turning off the water to the washing machine when it's not in use.
- Don't operate a dishwasher or washing machine while your house is unoccupied.
- Follow the manufacturer-specified maintenance for your appliances, including your water heater. Have the water heater inspected every couple of years.
Roof and Gutters
- Have your roof inspected every three years by a professional, but also check routinely for damage you can see from the ground — such as broken and missing shingles or damaged flashing. A poorly maintained roof can lead to leaks in the home and additional damage to the roof itself.
- If your roof doesn't have a drip edge or drip cap, consider having one added. This component helps keep water away from the roof deck and directs runoff into gutters.
- Keep gutters clear and well-maintained. Gutters that overflow, leak or don't drain properly allow water to seep into your roof and into your foundation, crawlspace or basement.
- Make sure gutter downspouts direct rainwater away from the home's foundation. Use extensions to carry water at least 6 feet from the house.
Exterior Walls and Foundation
- Inspect the exterior of your home. Caulk around gaps at plumbing and ventilation entry and exit points.
- Check to see if roots from shrubs near your home have caused damage that can allow water to enter the foundation. You may need to remove shrubs that are close to the house to prevent problems. Roots can also damage and block in-ground pipes, causing leaks near the foundation and sewer backups in the home.
- Keep shrubbery beds and other landscape features sloped to direct water away from the home.
- Look for evidence of erosion or settling at the foundation that can indicate water problems.
Additional Tips to Avoid Water Damage
- Have your attic ventilation and insulation inspected annually and seal gaps that allow warm air into the attic — such as those around access doors and light fixtures. When warm air collects in the attic, it can lead to the formation of an ice dam — ice around the eaves that causes water from melting snow and ice to back up under the shingles and leak into your home.
- If you have a sump pump, test it several times during the year. Follow the manufacturer's maintenance instructions.
- Check your water pressure with a pressure gauge; typically these screw onto a hose bib. The pressure in an average home is around 50 to 70 pounds per square inch (psi). Higher pressure causes extra stress on pipes and fittings and can lead to leaks.
- Inspect tile and grout around showers and tubs. Make any necessary repairs.
- Check for leaks around windows during rains and seal any you find.
- Use exhaust fans in the kitchen and bathroom to move excess moisture out of the house. Moisture in the air can condense on cool surfaces and cause problems.
- Locate your water shut-off valve so you can quickly turn off water to the home in an emergency.
Water Removal and Water Extraction
11/13/2018 (Permalink)
The water damage restoration process begins with a detailed inspection of your property, including a damage assessment. The SERVPRO Franchise Professional is determining the scope of the damage so he or she can develop an appropriate plan of action. Being careful and cautious is also a Priority. Also, Making sure electrical items, Appliances, and Outlets are Not a Hazard.
They Identify and Stop the Water Source
They check for the source of water in your home and business and stop it. The water source must be stopped before the drying process can begin.
- Stop the Source
- Check for Contaminated Water
They Identify the Type of Water
SERVPRO Franchise Professionals must identify the category and classification of water to restore your property safely to industry specifications. The type of water contamination will affect the specific restoration processes used to restore your property.
- White / Category 1 Water
- Gray / Category 2 Water
- Black / Category 3 Water
They Survey the Extent of the Water Damage and Inspect the Premises
They inspect and test your home to discover the extent of the damage. Additionally, they will look for safety concerns and explain them to you. If you are aware of any safety issues, such as asbestos or lead, please share them.
- Survey Damage
- Complete Safety Inspection
They Move or Block Furniture
They move furniture and property contents and block items to help prevent rust or furniture stains on wet carpet.
The water extraction step removes the majority of the water from your home or property. By performing a thorough water extraction, SERVPRO Franchise Professionals help reduce the drying time and help to prevent mold and secondary water damage. They use powerful pumps and truck-mounted vacuum units to quickly remove hundreds or thousands of gallons of water from your property.
Move-Out / Pack-Out
If your home requires extensive restoration or cleaning, SERVPRO Franchise Professionals can conduct an organized, efficient move-out to protect your belongings from further damage.
Emergency Water Removal
Highly trained technicians will begin the water removal process almost immediately. Depending on the amount of water, they may use powerful submersible pumps in addition to industrial strength, wet/dry vacuums. This step helps to reduce drying time and helps to prevent mold and secondary water damage.
- Remove Excess Water
- Use Submersible Pumps and Industrial Wet/Dry Vacuums
Inspect the Carpet Pad and Carpet
SERVPRO Franchise Professionals inspect the carpet and pad and determine if it should be removed to protect the subfloor.
- Inspect Carpet Pad and Remove If Needed
- Inspect Carpet and Remove If Needed
Water Removal Equipment
- Moisture detectors, hygrometers, and other meters measure the extent of moisture saturation.
- Infrared cameras may be used to find “hidden” water behind walls and ceilings.
- Submersible and gas-powered pumps are used for continuous pumping of high-level water.
- Truck-mounted and portable extraction units perform efficient water removal.
Do's and Don'ts of Water Intrusion
11/8/2018 (Permalink)
Do:
* Remove as much excess water as possible by mopping and blotting.
* Wipe excess water from wood furniture after removal of lamps and table top items.
* Remove and prop wet upholstery and pillow cushions for even drying.
* Place aluminum foil or wood blocks between furniture legs and wet carpeting.
* Turn air conditioning on for maximum drying in summer.
* Remove Oriental rugs or other colored rugs from wet wall-to-wall carpeting.
* Remove valuable paintings and art objects to a safe, dry place.
* Open and place luggage, in sunlight to dry, if possible.
* Gather loose items, toys, etc. from floors.
Don’t:
* Leave wet fabrics in place; dry as soon as possible. Hang furs and leather goods to dry separately at room temperature.
* Leave books, magazines or other colored items on wet carpets or floors.
* Use your household vacuum to remove water.
* Use TVs or other household appliances while standing on wet carpets or floors, especially not on wet concrete floors.
* Turn on ceiling fixtures if ceiling is wet, and keep out
CALL SERVPRO 1-856-686-0100
Tips to Avoid Water Damage
9/7/2018 (Permalink)
Blog | SERVPRO Franchise Website Administration
Standing water on the floor is easy to see. Less obvious signs of problems include:
- Unexpected increases in your water bill
- Stains on walls, floors or ceilings
- Damaged or warped flooring
- Warped bottom panels in under-sink cabinets
- Peeling paint or wallpaper
- Corrosion on plumbing valves and fittings
Deal with problems as you find them. Clean up any water or moisture, locate the source and make repairs. Tracking down a leak isn't always straightforward — water can travel along components in the building structure, so the indications of the leak may be in a different part of the home than the leak itself. If necessary, contact a professional roofing contractor, plumber or water damage restoration specialist to help with identification and repair.
In addition to the damage that water causes, it can encourage the growth of mold on walls and floors — where it's readily visible — and in ductwork, attics and crawl spaces — where you might not notice it. A musty odor is a sign that mold may be present.
Mold can cause damage and lead to health problems — deal with it quickly. If the affected area is larger than 3 feet by 3 feet, the Environmental Protection Agency recommends you find a professional mold remediation contractor. For smaller areas, you can clean nonporous surfaces with commercial cleaning products, soap and water or a solution of a cup of bleach to each gallon of water. Follow the instructions and safety precautions for the cleaning product you use and wear appropriate safety gear. Porous surfaces such as drywall need to be replaced. For more information on mold in the home and how to clean it up, see A Brief Guide to Mold, Moisture, and Your Home on the EPA's web site.
Inspecting common sources of water leaks and taking some simple preventative measures can be an effective way to reduce the risk of water damage and mold.
Plumbing
- Every 6 to 12 months, inspect water lines, shut-off valves and fittings for fixtures such as sinks, toilets and tubs and for appliances such as washing machines, dishwashers and ice makers. Check for cracks, loose connections, kinks and corrosion. If you find a leak, turn off the water to the fixture or appliance until you can make repairs.
- Check around toilets to make sure water is not leaking at the base — an indication that the wax ring between the toilet and floor might need replacing or that there might be a crack in the base.
- If the temperature drops near the 20°F mark, allow faucets connected to vulnerable pipes — those not protected in insulated spaces — to drip. This helps minimize the risk of burst pipes by relieving pressure if the pipes freeze.
Appliances
- Replace washing machine supply hoses at least every five years. Consider using stainless-steel mesh hoses. Keep the machine properly balanced — over time, an unbalanced machine can move, pulling free the hose connections. Read Maintain Your Washer and Dryer for instructions on replacing hoses and balancing the washing machine.
- Consider turning off the water to the washing machine when it's not in use.
- Don't operate a dishwasher or washing machine while your house is unoccupied.
- Follow the manufacturer-specified maintenance for your appliances, including your water heater. Have the water heater inspected every couple of years.
Roof and Gutters
- Have your roof inspected every three years by a professional, but also check routinely for damage you can see from the ground — such as broken and missing shingles or damaged flashing. A poorly maintained roof can lead to leaks in the home and additional damage to the roof itself.
- If your roof doesn't have a drip edge or drip cap, consider having one added. This component helps keep water away from the roof deck and directs runoff into gutters.
- Keep gutters clear and well-maintained. Gutters that overflow, leak or don't drain properly allow water to seep into your roof and into your foundation, crawlspace or basement. See Gutter Cleaning and Repair for steps to keep your gutters working correctly.
- Make sure gutter downspouts direct rainwater away from the home's foundation. Use extensions to carry water at least 6 feet from the house.
Exterior Walls and Foundation
- Inspect the exterior of your home. Caulk around gaps at plumbing and ventilation entry and exit points. See How to Caulk for instructions. Repair cracked mortar joints.
- Check to see if roots from shrubs near your home have caused damage that can allow water to enter the foundation. You may need to remove shrubs that are close to the house to prevent problems. Roots can also damage and block in-ground pipes, causing leaks near the foundation and sewer backups in the home.
- Keep shrubbery beds and other landscape features sloped to direct water away from the home.
- Look for evidence of erosion or settling at the foundation that can indicate water problems.
Additional Tips to Avoid Water Damage
- Have your attic ventilation and insulation inspected annually and seal gaps that allow warm air into the attic — such as those around access doors and light fixtures. When warm air collects in the attic, it can lead to the formation of an ice dam — ice around the eaves that causes water from melting snow and ice to back up under the shingles and leak into your home.
- If you have a sump pump, test it several times during the year. Follow the manufacturer's maintenance instructions.
- Check your water pressure with a pressure gauge; typically these screw onto a hose bib. The pressure in an average home is around 50 to 70 pounds per square inch (psi). Higher pressure causes extra stress on pipes and fittings and can lead to leaks.
- Inspect tile and grout around showers and tubs. Make any necessary repairs. Read Replace a Broken Ceramic Tile and Repair Tile Grout for step-by-step instructions.
- Check for leaks around windows during rains and seal any you find.
- Use exhaust fans in the kitchen and bathroom to move excess moisture out of the house. Moisture in the air can condense on cool surfaces and cause problems. Read Controlling Moisture and Humidity in the Home for more ways to reduce indoor moisture.
- Locate your water shut-off valve so you can quickly turn off water to the home in an emergency. See Shut Off Your Home Water Supply for instructions on locating the valve.
Fire And Water Damage Restoration Companies, Have Standards
11/30/2017 (Permalink)
 Fire And Water Damage Restoration Companies, Have Standards
Fire and water damage restoration are essential services that protect families and their homes from severe issues. Whether it’s bad wiring, a flood, or a burst pipe, these professionals are capable of making the home safe to live in again. But getting it back to that state takes some real expertise and manpower, and it’s the kind of expertise that a certified firm can provide the best. There are serious health implications involved as well, so a homeowner wouldn’t want anyone else handling the job.
Why should a homeowner only consider a certified firm for fire and water damage restoration?
Floods and flames produce an immediate threat, and of course families are going to be pressed by the imminent danger, but these disasters can cause long-term problems as well. Pools of contaminated water, like those left behind by a storm or sewage backflow, are infested with a variety of pathogens and are also catalysts for explosive microbial growth. Molds, in particular, are common organisms found in the wake of contaminated moisture, and can take root in the home in as little as 48 hours if the problem is not dealt with by then. Mold is a significant concern, especially for families with young children, as it can cause lingering respiratory and behavioral complications. Mold can also spread quickly if it is given the chance to release airborne spores.
Flames leave behind a different kind of pest. Ash is a copious byproduct of burned out material, and it is both light and acidic. This means it can easily be swept up by air currents in the home and settle on a variety of items it can damage. If it is not cleaned up right away, it will begin etching glass, corroding metal, and discoloring drywall and porcelain. Ash can also irritate the throat, nose and lungs, inflaming conditions like asthma and allergies. This will happen over a matter of days, so a prompt response is required to stop it in its tracks.
Fire and water damage restoration firms are qualified to halt and reverse the spread of molds, ash, and other hazards. Given the time-sensitive nature of their work, reputable crews are normally available around the clock and can begin work immediately. A certified firm, one that has been trained by an organization like the Institute of Inspection, Cleaning and Restoration Certification (IICRC), will have the tools and methods needed to make the home safe to live in again. With proper training, professionals will be able to quickly establish a workspace inside the home, drain the excess water, and eliminate debris caused by the disaster. Over the next several days, they can set up equipment to expedite the drying process, saving any materials they can that have been exposed to water, or wash away ash residue, which has a tendency to get everywhere. These professionals can also inspect the building thoroughly for common trouble areas and confirm that there is no lingering moisture or ash hiding in wait.
By the time a certified firm has completed their work, the building will be transformed back to its original state, waiting for the family to settle back in and continue their lives.
11 Tips to Protect and Prevent Pipes from Freezing
11/24/2017 (Permalink)
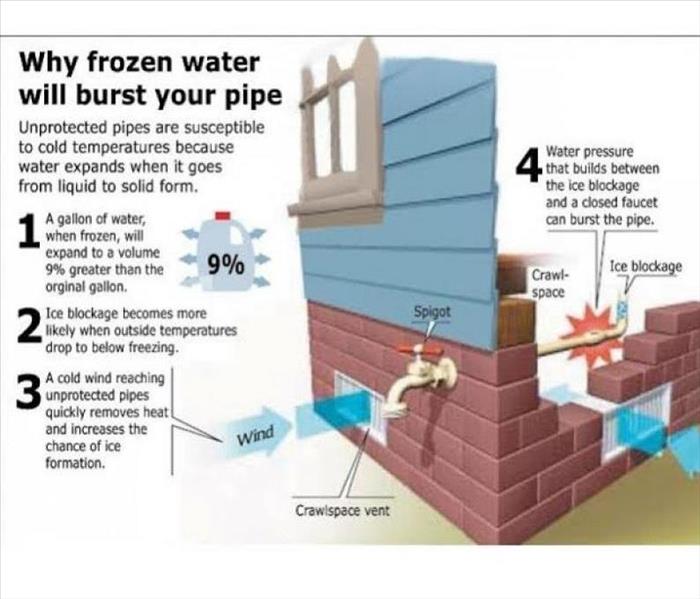 11 Tips to Protect and Prevent Pipes from Freezing
Why Pipe Freezing is a Problem
Water has a unique property in that it expands as it freezes. This expansion puts tremendous pressure on whatever is containing it, including metal or plastic pipes. No matter the strength of a container, expanding water can cause pipes to break.
Pipes that freeze most frequently are:
Pipes that are exposed to severe cold, like outdoor hose bibs, swimming pool supply lines, and water sprinkler lines.
Water supply pipes in unheated interior areas like basements and crawl spaces, attics, garages, or kitchen cabinets.
Pipes that run against exterior walls that have little or no insulation.
How to Protect Pipes From Freezing
Before the onset of cold weather, protect your pipes from freezing by following these recommendations:
Drain water from swimming pool and water sprinkler supply lines following manufacturer's or installer's directions. Do not put antifreeze in these lines unless directed. Antifreeze is environmentally harmful, and is dangerous to humans, pets, wildlife, and landscaping.
Remove, drain, and store hoses used outdoors. Close inside valves supplying outdoor hose bibs. Open the outside hose bibs to allow water to drain. Keep the outside valve open so that any water remaining in the pipe can expand without causing the pipe to break.
Add insulation to attics, basements and crawl spaces. Insulation will maintain higher temperatures in these areas.
Check around the home for other areas where water supply lines are located in unheated areas. Look in the garage, and under kitchen and bathroom cabinets. Both hot and cold water pipes in these areas should be insulated.
Consider installing specific products made to insulate water pipes like a "pipe sleeve" or installing UL-listed "heat tape," "heat cable," or similar materials on exposed water pipes.
Consider relocating exposed pipes to provide increased protection from freezing.
How to Prevent Frozen Pipes
Keep garage doors closed if there are water supply lines in the garage.
Open kitchen and bathroom cabinet doors to allow warmer air to circulate around the plumbing. Be sure to move any harmful cleaners and household chemicals up out of the reach of children.
When the weather is very cold outside, let the cold water drip from the faucet served by exposed pipes. Running water through the pipe - even at a trickle - helps prevent pipes from freezing.
Keep the thermostat set to the same temperature both during the day and at night. By temporarily suspending the use of lower nighttime temperatures, you may incur a higher heating bill, but you can prevent a much more costly repair job if pipes freeze and burst.
If you will be going away during cold weather, leave the heat on in your home, set to a temperature no lower than 55° F.
Do You Have an Evacuation Plan and Procedure
11/21/2017 (Permalink)
 Do You Have an Evacuation Plan and Procedure
For smaller organizations, the plan does not need to be written and may be communicated orally if there are 10 or fewer employees. [29 CFR 1910.38(b)]
At a minimum, the plan must include but is not limited to the following elements [29 CFR 1910.38(c)]:
- Means of reporting fires and other emergencies
- Evacuation procedures and emergency escape route assignments
- Procedures for employees who remain to operate critical plant operations before they evacuate
- Accounting for all employees after an emergency evacuation has been completed
- Rescue and Medical Duties for Employees Performing Them
- Names or job titles of persons who can be contacted
Although they are not specifically required by OSHA, you may find it helpful to include the following in your plan:
- A description of the alarm system to be used to notify employees (including disabled employees) to evacuate and/or take other actions. The alarms used for different actions should be distinctive and might include horn blasts, sirens, or even public address systems.
- The site of an alternative communications center to be used in the event of a fire or explosion.
- A secure on- or offsite location to store originals or duplicate copies of accounting records, legal documents, your employees' emergency contact lists, and other essential records.
A floor plan shows the possible evacuation routes in the building. It is color coded and uses arrows to indicate the designated exit. A room containing hazardous materials is indicated in the lower right hand corner of the building by the flame symbol. The assembly area is indicated outside the primary exit at the top of the building.
An evacuation floor plan with three exits, has the primary exit designated in the upper left by red arrows, with two main flows coming toward it indicated by bent arrows, the red rooms, and red elevator. Persons in the upper left half of the building are directed toward this exit.
The secondary exit is located centrally on the adjacent outer wall on the right side of the building. Persons in the top hallway and second hallway are directed with tan arrows from the tan colored rooms toward this exit. A male and female figure (representing restrooms) are indicated in the first tan colored rooms in the upper hallway. The individuals should exit along the hallway toward the secondary exit at the right side of the building. Both the primary and secondary exits are marked with handicapped signs.
There is a third exit in the last hallway, centrally located in the outer wall opposite the outer wall with the primary exit and adjacent to the outer wall with the secondary exit. Persons in the third hallway are directed by blue arrows from the blue colored rooms and blue elevator to exit out this doorway. This exit is not designated for handicapped persons as stairs are indicated.
Colored boxes indicate a row of rooms along the outer walls, with hallways parallel to the rows of outer rooms on three sides of the building. The outer wall on the left side of the building has a hallway along the outer wall. Four sets of six colored rooms are along the internal corridors and there are three large rooms centrally located with internal hallways connecting the top and bottom of the building.
The Primary Exit is marked with an arrow from the text below the map, as is the Secondary Exit. An X inscribed in a circle marks the position of the employee, indicated in the legend, in text "You are here". On the floor plan, the employee is located in the upper left hand corner in the internal set of six red colored rooms, in the central room in the second hallway. The employee may exit the red colored room, either to the left or right (indicated by red arrows), and then proceed toward the outer wall and the upper left primary exit.
For more details visit the OSHA website:
https://www.osha.gov/SLTC/etools/evacuation/min_requirements.htm
Use Food Coloring to Diagnose a Leaking Toilet,
11/14/2017 (Permalink)
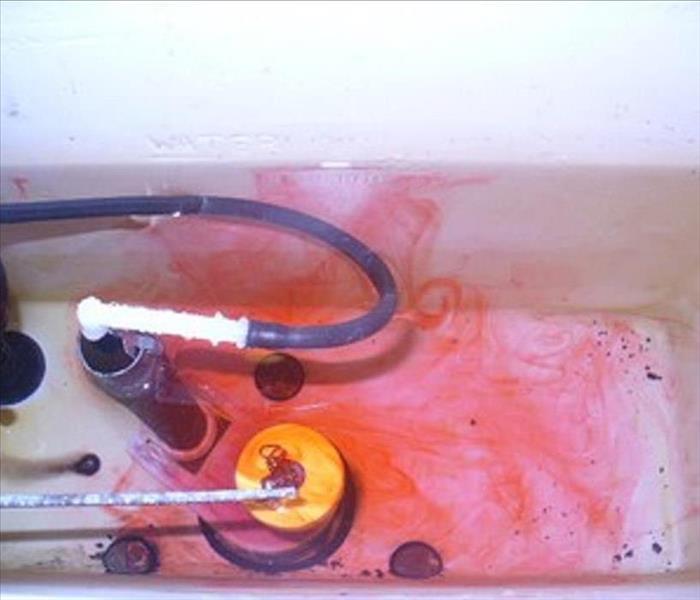 Use Food Coloring to Diagnose a Leaking Toilet,
If you have a heavy leak in your toilet, it's easy to diagnose—the faint sound of the toilet tank constantly replenishing is a dead give away. What about a slow leak? Diagnose it with food coloring.
If you have a slow leak in your toilet tank, hundreds of gallons are just slowly and silently cascading down the side of your toilet bowl every month. Fortunately you can easily detect if the uptick in your water bill is from a slow leak or not.
A simple test for toilet water leaks, place a half dozen or so drops of food coloring in the toilet tank. Leave the toilet alone for a half hour or more. Come back and check to see if the water in the bowl of the toilet has become tinted with the food-coloring dye from the tank. If it has, you've got a leak between the tank and the bowl.
How to check your toilet for leaks
- Remove the toilet tank lid.
- Drop one dye tablet or 10 drops of food coloring into the tank. (Dye tablets are often available for free through local water Providers.
- Put the lid back on. Do not flush.
- Wait at least 10-15 minutes, and then look in the bowl. If you see colored water, you have a leak. If not, you don't.
How a $10 pipe can cost thousands in water damage to your home,
11/10/2017 (Permalink)
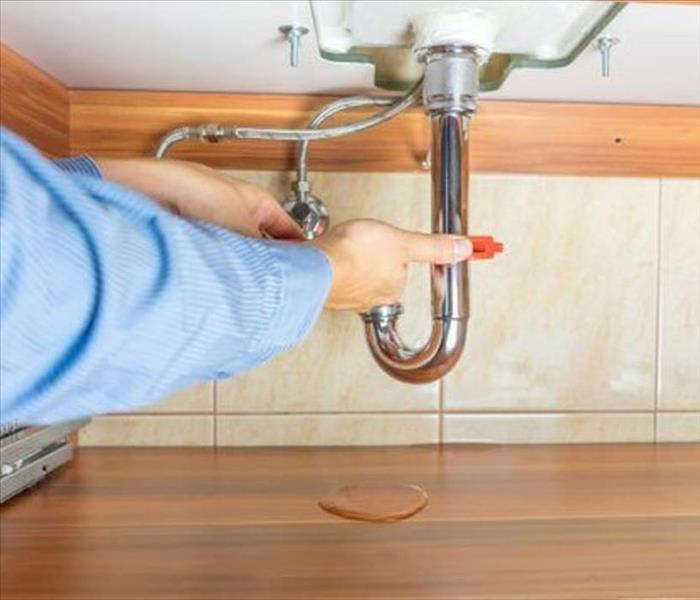 How a $10 pipe can cost thousands in water damage to your home,
One of the most common causes of internal flooding in homes is from a burst flexible water hose, or ‘flexi hose’, an increasingly common plumbing items around the world.
The flexi hose is a plumbing connection from the water main to major appliances, sinks and toilets, and has come into the spotlight as one of the top reasons a home is flooded — from water leakages and ruptures, to major water bursts.It’s highly likely you have flexi hoses installed in your home. So just how preventable are flexi hose water leakages, ruptures and bursts?
What are Flexible Water Hoses?
Flexible water hoses, or ‘flexi hoses’, are a versatile hose commonly installed in modern homes and to replace standard copper pipe installations in older homes.
Found in connections from the wall outlet to taps, sinks, basins and tubs, flexi hoses are also used to connect water from the toilet stop tap to the cistern.
Constructed in outer braided layers of stainless steel with a rubber pipe interior, the flexi hose — as its name suggests — is designed for its malleability and can be shaped to meet a range of home plumbing hardware solutions.
So why are so many people experiencing problems with flexi hoses?
In general, there are many reasons why a burst may occur — the main culprits tend to be:
- The age of the water hose – most hoses have a life span of five years
- Incorrect installation – over tightening, over stretching, and looseness can cause the pipe to fail
- Incremental damage through limited or no maintenance – rusting, fraying and kinking can cause the pipe to bust.
While flexi hoses tend to be the preferred option for many installations, there is a general consensus amongst plumbing professionals that they are also a leading cause of house flooding, with spoiled carpets, warping of wooden floors and water-damaged ceilings on multi-floor homes too often the result.
The main reasons behind the widely agreed consensus that flexi hoses are a major cause of flooding in homes is due to four key factors: Questionable products on the market, incorrect installation, a lack of simple maintenance checks and the overall age of the flexi hose — and with that, there is also good news:
Water damage to your home from a burst flexi hose is largely preventable.
What follows is a range of causes that can compromise the integrity of the flexi hoses in your home, followed by ways you are more likely to prevent them.
The Most Important Thing is Prevention
Paramount to preventing flooding in your home is to have a licenced plumber install all flexible water hoses, or check those already installed to professionally confirm the integrity of the product.
It’s also a good idea to show everyone in your home where the main water valve is located so they can stop the water in case of an emergency.
The Installation Factor
The DIY factor is at the heart of our culture and has intensified with the rise of television shows all about ways to ‘do it yourself’.
However, the installation of flexi hoses requires specialised knowledge that a licenced plumber is best to provide — and while the initial financial outlay may be more than the perceived savings from a DIY installation, you’re more likely to save in the long run.
For example, as with most products, flexi hoses vary in quality and your home can be compromised by the choice of water hose you buy. More expensive does not immediately lend to better quality and a licenced plumber will more likely know which type and brand of water hose is right for your home.
Flexi hoses also vary in length and choosing the wrong size can make the hose too taut, putting the hose under stress by being stretched, or too loose, allowing the hose to become kinked or twisted. Either way, installing the incorrect length of flexi hose will cause it to fray and unravel over time, leading to a major leak.
Flexi hoses are also easy to over-tighten, with excessive force applied to the end fittings of a flexi hose in order to obtain a watertight seal. However, such force can cause a fracture in the rubber seal connection, which, over time, is likely to cause a major rupture.
While flexi hoses are generally seen as robust products, if they are put under great strain due to being damaged at the time of installation, the likelihood of structural breakdown is high.
It’s worth considering a licenced plumber to install any and all flexi hoses around your home — and if you’re in any doubt of the flexi hose systems already installed, consider having a plumber come to your home for an inspection.
Basement Water issues, Sump Pump malfunctions, and water damage
10/24/2017 (Permalink)
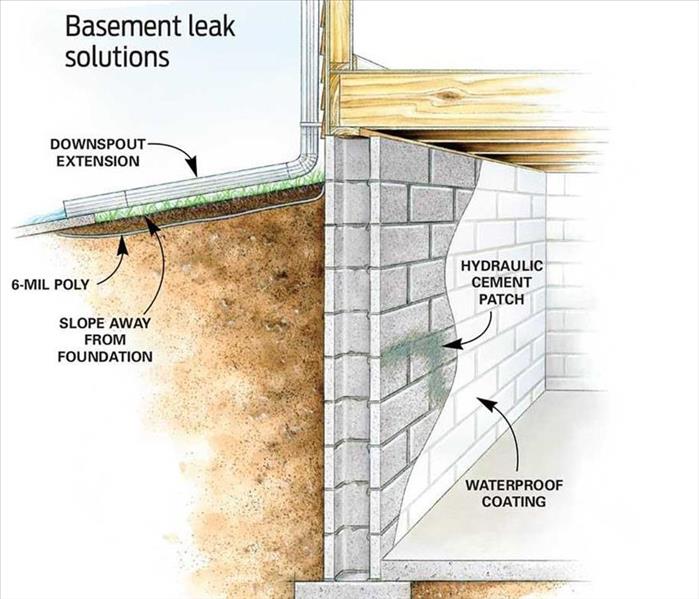 Basement Water issues, Sump Pump malfunctions, and water damage
Standing water on the floor is easy to see. Less obvious signs of problems include:
Unexpected increases in your water bill
- Stains on walls, floors or ceilings
- Damaged or warped flooring
- Warped bottom panels in under-sink cabinets
- Peeling paint or wallpaper
- Corrosion on plumbing valves and fittings
Deal with problems as you find them. Clean up any water or moisture, locate the source and make repairs. Tracking down a leak isn't always straightforward — water can travel along components in the building structure, so the indications of the leak may be in a different part of the home than the leak itself. If necessary, contact a professional roofing contractor, plumber or water damage restoration specialist to help with identification and repair.
In addition to the damage that water causes, it can encourage the growth of mold on walls and floors — where it's readily visible — and in ductwork, attics and crawl spaces — where you might not notice it. A musty odor is a sign that mold may be present.
If the affected area is larger than 3 feet by 3 feet, the Environmental Protection Agency recommends you find a professional mold remediation contractor. For smaller areas, you can clean nonporous surfaces with commercial cleaning products, soap and water or a solution of a cup of bleach to each gallon of water. Follow the instructions and safety precautions for the cleaning product you use and wear appropriate safety gear. Porous surfaces such as drywall need to be replaced. For more information on mold in the home and how to clean it up
Inspecting common sources of water leaks and taking some simple preventative measures can be an effective way to reduce the risk of water damage and mold.
Plumbing
- Every 6 to 12 months, inspect water lines, shut-off valves and fittings for fixtures such as sinks, toilets and tubs and for appliances such as washing machines, dishwashers and ice makers. Check for cracks, loose connections, kinks and corrosion. If you find a leak, turn off the water to the fixture or appliance until you can make repairs.
- Check around toilets to make sure water is not leaking at the base — an indication that the wax ring between the toilet and floor might need replacing or that there might be a crack in the base.
- If the temperature drops near the 20°F mark, allow faucets connected to vulnerable pipes — those not protected in insulated spaces — to drip. This helps minimize the risk of burst pipes by relieving pressure if the pipes freeze.
Appliances
- Replace washing machine supply hoses at least every five years. Consider using stainless-steel mesh hoses. Keep the machine properly balanced — over time, an unbalanced machine can move, pulling free the hose connections.
- Consider turning off the water to the washing machine when it's not in use.
- Don't operate a dishwasher or washing machine while your house is unoccupied.
- Follow the manufacturer-specified maintenance for your appliances, including your water heater. Have the water heater inspected every couple of years.
Roof and Gutters
- Have your roof inspected every three years by a professional, but also check routinely for damage you can see from the ground — such as broken and missing shingles or damaged flashing. A poorly maintained roof can lead to leaks in the home and additional damage to the roof itself.
- If your roof doesn't have a drip edge or drip cap, consider having one added. This component helps keep water away from the roof deck and directs runoff into gutters.
- Keep gutters clear and well-maintained. Gutters that overflow, leak or don't drain properly allow water to seep into your roof and into your foundation, crawlspace or basement.
- Make sure gutter downspouts direct rainwater away from the home's foundation. Use extensions to carry water at least 6 feet from the house.
Exterior Walls and Foundation
- Inspect the exterior of your home. Caulk around gaps at plumbing and ventilation entry and exit points.
- Check to see if roots from shrubs near your home have caused damage that can allow water to enter the foundation. You may need to remove shrubs that are close to the house to prevent problems. Roots can also damage and block in-ground pipes, causing leaks near the foundation and sewer backups in the home.
- Keep shrubbery beds and other landscape features sloped to direct water away from the home.
- Look for evidence of erosion or settling at the foundation that can indicate water problems.
Additional Tips to Avoid Water Damage
- Have your attic ventilation and insulation inspected annually and seal gaps that allow warm air into the attic — such as those around access doors and light fixtures. When warm air collects in the attic, it can lead to the formation of an ice dam — ice around the eaves that causes water from melting snow and ice to back up under the shingles and leak into your home.
- If you have a sump pump, test it several times during the year. Follow the manufacturer's maintenance instructions.
- Check your water pressure with a pressure gauge; typically these screw onto a hose bib. The pressure in an average home is around 50 to 70 pounds per square inch (psi). Higher pressure causes extra stress on pipes and fittings and can lead to leaks.
- Inspect tile and grout around showers and tubs. Make any necessary repairs.
- Check for leaks around windows during rains and seal any you find.
- Use exhaust fans in the kitchen and bathroom to move excess moisture out of the house. Moisture in the air can condense on cool surfaces and cause problems.
- Locate your water shut-off valve so you can quickly turn off water to the home in an emergency.
Why Is My Air Conditioner Leaking Water Inside My House, Water damage restoration in Westville NJ, Water damage restoration in Woodbury NJ,
9/22/2017 (Permalink)
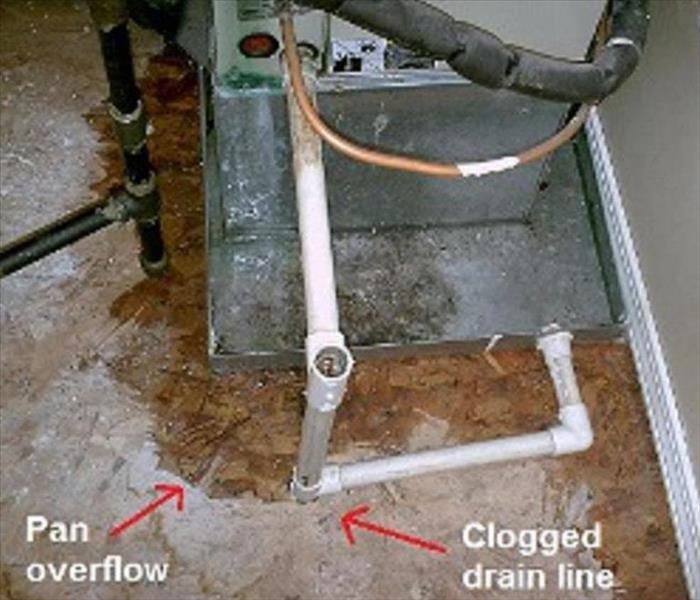 Why Is My Air Conditioner Leaking Water Inside My House, Water damage restoration in Westville NJ, Water damage restoration in Woodbury NJ,
Why Is My Air Conditioner Leaking Water Inside My House, Water damage restoration in Westville NJ, Water damage restoration in Woodbury NJ,
First, turn off your AC to prevent serious water damage and hazardous electrical issues. Next, we highly recommend calling a HVAC company for help.
Why water forms in an AC’s indoor unit
Condensation is a natural reaction that occurs inside all AC units.
You see, your AC’s job is to pull heat and humidity from the air inside your home. To do that, your system pulls in warm air through an indoor vent (called a return grille) and moves it across your inside unit’s cold evaporator coil to cool the air down.
When this happens, moisture forms on the evaporator coil. Just like the condensation that forms on a glass of ice cold water on a hot summer day.
Normally, the condensation on the coil drips into a drain pan and down a condensate drain pipe that leads it outside of your home (or into your plumbing system).
Now that you know why the condensation happens and the parts involved, here are a few common problems that can cause water to leak inside your house.
Clogged condensate drain line or rusted pan
If your drain line is clogged–commonly by dirt, algae, insects or a dirty evaporator coil–water drainage is limited; causing a buildup of water with nowhere to go other than your home.
And because it is so hot and humid, your AC runs more often so it doesn’t take long for large amounts of water to build up.
Also, the drain pan may be rusted through, allowing the water to fall through the pan and cause disastrous leaks and dangerous electrical issues inside your home. So, you’ll definitely need to replace the pan.
Improperly installed condensate trap
If your AC is fairly new, the problem could be with the way your system’s condensate trap was installed. An improperly designed condensate trap can block drainage and cause the drain pan to overflow with water.
What to do: You’ll need a professional to know what to look for in a condensate trap design and to see if it needs to be reinstalled.
Frozen evaporator coil
Condensation on your cold evaporator coil can also freeze. If it does, there’s a clear problem with your AC. It can even freeze all the way down the refrigerant lines to the outside unit.
And when it melts, there can be a lot of unwanted water in unwanted places throughout your home.
Common causes of a frozen coil include:
- Dirty air filter
- Low refrigerant
- An airflow problem
Other issues...
There are a number of problems that cause water leakage from your AC but these are a few of the most common. We understand this stuff can get pretty complicated.
Note: Depending on where the inside unit is and what specifically is causing water to leak inside your home, the damage could be pretty significant and extremely dangerous. Many, if not all, of these problems require a professional to ensure safety and proper resolution.
Contact a Certified Water Damage and Mold remediation company, to resolve any Microbial issues,
Water Damage Restoration in Deptford NJ, Water damage restoration in Westville NJ, Emergency Tips,
9/19/2017 (Permalink)
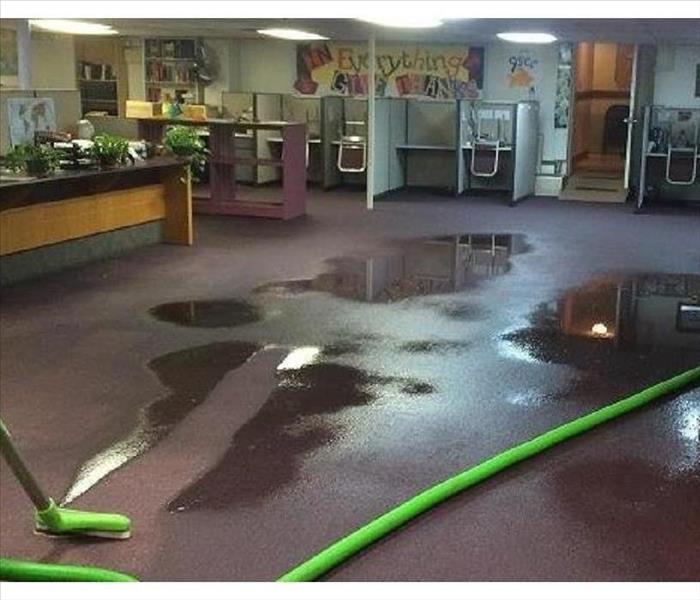 Water Damage Restoration in Deptford NJ, Water damage restoration in Westville NJ, Emergency Tips,
After any water damage situation, your primary focus should be safety:
- Is it safe to stay in the house?
- Electrical and "slip and fall" hazards are some of the most prevalent concerns.
- Only do activities that are safe for you to perform.
- Wet materials can be VERY heavy. Be careful!
What To Do After Flooding
- Remove excess water by mopping and blotting.
- Wipe excess water from wood furniture after removal of lamps and tabletop items.
- Remove and prop wet upholstery and cushions.
- Place aluminum foil or wood blocks between furniture legs and wet carpeting.
- Turn air conditioning on for maximum drying in summer.
- Remove colored rugs from wet carpeting.
- Remove art objects to a safe, dry place.
- Gather loose items from floors.
What NOT To Do After Flooding
- Don't leave wet fabrics in place. Hang furs and leather goods.
- Don't leave books, magazines or other colored items on wet carpet or floors.
- Don't use your household vacuum to remove water.
- Don't use television or other household appliances.
- Don't turn on ceiling fixtures if ceiling is wet, and keep out of rooms where ceilings are sagging.
Then Call a Certified Water Damage Restoration Contractor, for Proper Drying, Dehumidifying, Possible Demolition and Clean Up!
Another Satisfied SERVPRO customer, Awesome Thank you Email, in attached pictures,
9/8/2017 (Permalink)
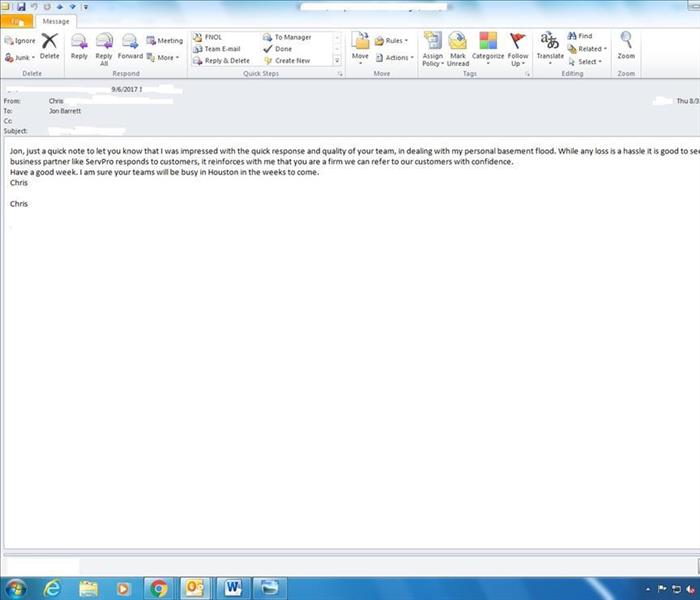 Another Satisfied SERVPRO customer, Awesome Thank you Email, in attached pictures,
Another Satisfied SERVPRO customer, Awesome Thank you Email, in attached pictures,
Water Damage in Woodbury NJ, Commercial Water damage in Deptford NJ, Water damage in Westville NJ, SERVPRO Checklist,
9/7/2017 (Permalink)
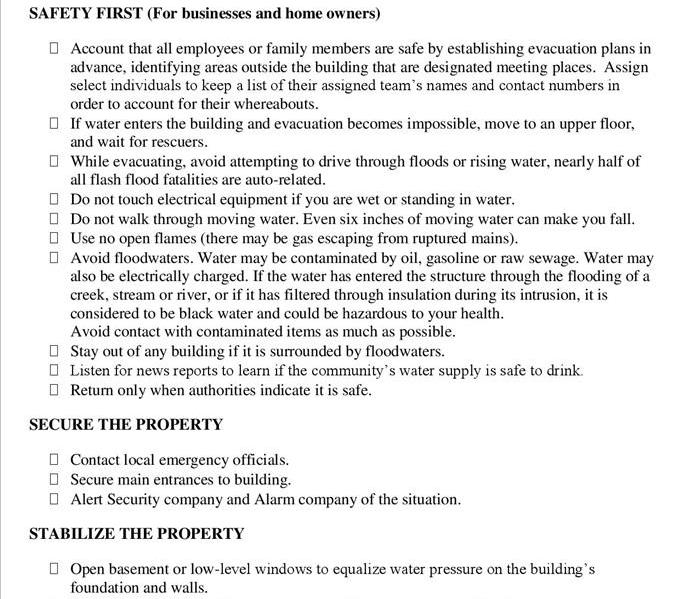 Water Damage in Woodbury NJ, Commercial Water damage in Deptford NJ, Water damage in Westville NJ, SERVPRO Checklist,
Water Damage in Woodbury NJ, Commercial Water damage in Deptford NJ, Water damage in Westville NJ, SERVPRO Checklist,
A Fast Response Is Crucial
In many cleaning and restoration situations, immediate action is needed. With over 1,700 U.S. and Canadian Franchise locations, SERVPRO is strategically positioned to be faster to any size emergency.
An immediate response helps to minimize the damage and the cleaning and restoration costs.
Water is particularly invasive, quickly spreading throughout your property and being absorbed into floors, walls, furniture, etc. SERVPRO Franchise Professionals arrive quickly and start the water extraction process almost immediately.
Water Damage Timeline
Within Minutes:
- Water quickly spreads throughout your property, saturating everything in its path.
- Water is absorbed into walls, floors, upholstery, and belongings.
- Furniture finishes may bleed, causing permanent staining on carpets.
- Photographs, books, and other paper goods start to swell and warp.
Hours 1 - 24:
- Drywall begins to swell and break down.
- Metal surfaces begin to tarnish.
- Furniture begins to swell and crack.
- Dyes and inks from cloth and paper goods spread and stain.
- A musty odor appears.
48 Hours to 1 Week:
- Mold and mildew may grow and spread.
- Doors, windows, and studs swell and warp.
- Metal begins to rust and corrode.
- Furniture warps and shows signs of mold.
- Paint begins to blister.
- Wood flooring swells and warps.
- Serious biohazard contamination is possible.
More Than 1 Week:
- Restoration time and cost increase dramatically; replacing contaminated materials and structural rebuilding may be extensive.
- Structural safety, mold growth, and biohazard contaminants pose serious risks to occupants.
9 Affordable Ways to Dry Up Your Wet Basement For Good, Water damage in Woodbury NJ, Water damage in Deptford NJ,
8/28/2017 (Permalink)
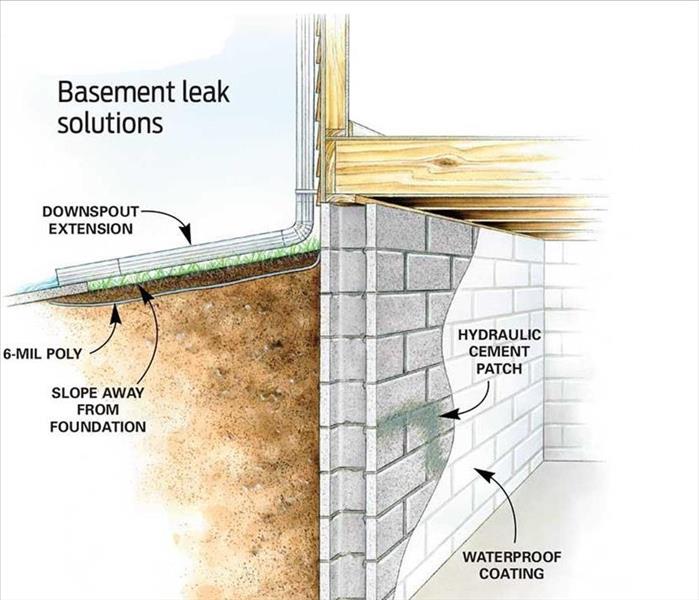 9 Affordable Ways to Dry Up Your Wet Basement For Good, Water damage in Woodbury NJ, Water damage in Deptford NJ,
Diagnose the Water Problem
Water or moisture in basements comes from two sources. One source is indoor humidity that condenses on cold surfaces, much like water droplets form on a cold drink on a humid day. The other is water—or water vapor—that comes from outside. Rainwater, melting snow or groundwater can saturate the soil around your foundation and leak in. Water can leak through cracks, or it can penetrate porous concrete or masonry walls in the form of water vapor. To figure out what's causing the problem, tape aluminum foil to your basement wall and inspect it a few days later. Moisture on the outside surface of the foil indicates high indoor humidity. Moisture behind the foil means moisture is leaking through the walls.
Get Rid of Excess Humidity
Eliminating the sources of humid air will help dry out your basement. Seal leaky dryer vents with foil tape to prevent unwanted humid air from entering your basement. Don't just use duct tape; it'll eventually fall off. Add a vent fan to your basement bathroom and make sure your family turns it on during showers. Keep your basement windows closed during humid weather. And if you're still getting condensation on cool surfaces, run a dehumidifier to lower the indoor humidity.
Insulate Pipes
Condensation dripping from cold pipes can contribute to basement water problems. Cover cold water pipes with foam pipe insulation to stop condensation. The foam insulation is inexpensive and easy to cut with scissors.
Insulate Walls
Insulate exterior walls to prevent condensation. In cold climates, insulating basement walls also saves energy and reduces your heating bill. But don't cover the walls with insulation if water is leaking in from outside; you'll just create a potential mold problem.
Keep Water Away From the Foundation
If your basement leaks after heavy rains or after snow melts, making sure water is diverted away from your foundation may solve the problem. It's common for the soil alongside your house to settle over time, creating a moat that collects runoff and directs it down your foundation wall and into the basement. Lawn edging and gravel along the foundation can make things worse. Solve the problem by creating a 6-ft.-wide slope that drops about 4 in. away from the foundation. For extra insurance, cover the sloping soil with a layer of 6-mil poly. Then hide the poly with mulch, gravel or a layer of soil covered with grass. This will keep water from soaking in near the foundation.
Add Gutters and Extend Downspouts
If your basement leaks after it rains and you don't have gutters, consider adding them. Gutters catch the rain and channel it to the downspouts, which direct it away from the house. Whether you're installing new gutters or already have them, be sure the downspouts have 4- to 6-ft. horizontal extensions to move the water away from the house.
Plug Holes and Cracks in the Foundation
Holes and cracks in your foundation can let moisture and water seep into your basement. Plugging them probably won't solve basement leaks, but it'll help. Hydraulic cement works great for patching holes in a foundation because it can set up even under water, and it expands as it sets to seal the hole and lock the plug in place. Use a cold chisel or an angle grinder fitted with a masonry-cutting disc or diamond blade to enlarge the hole or crack into an inverted “V,” with the narrow part of the “V” on the surface of the wall. Then follow the package instructions for mixing and using the hydraulic cement.
Waterproof the Walls
Waterproofing materials that go on like paint fill the pores in the concrete or masonry walls and prevent water from leaking in. To be effective, these coatings must be applied to bare concrete or masonry walls. Start by removing loose material with a wire brush. Then clean off any white powdery “efflorescence” with masonry cleaner. Follow the safety and application instructions carefully. A common mistake when using masonry waterproofing products is to spread them too thin. The goal is to fill every pinhole to create a continuous waterproofing membrane. Brush the coating in all directions to completely fill every pinhole. Add a second coat after the first dries.
Install a Drainage System
The best permanent fix for chronic basement leaks is to install drainage tubing below the basement floor that's connected to a sump basket and pump. You can install a system like this yourself, but breaking out the concrete floor, burying the tubing, and patching the floor is a lot of backbreaking work. Materials to do an average basement will cost $600 to $1,000. Expect to spend $3,000 to $8,000 for a professionally installed system in a standard-size basement.
Water Damage in Woodbury NJ, Water damage can be deceptive, Flood Damage in Woodbury NJ,
6/21/2017 (Permalink)
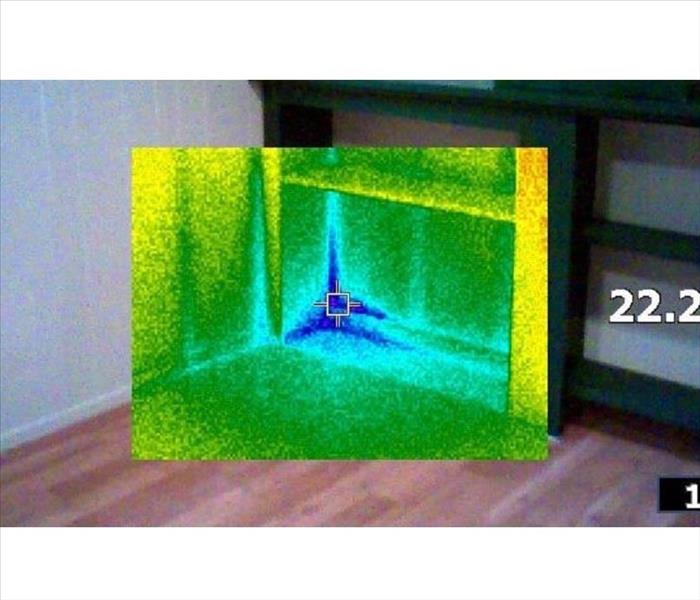 Water Damage in Woodbury NJ, Water damage can be deceptive, Flood Damage in Woodbury NJ,
Water Damage in Woodbury NJ, Water damage can be deceptive, Flood Damage in Woodbury NJ,
Water damage can be deceptive. Water penetrates into structural cavities creating trapped pockets of saturation. The detection of water in these areas can often only be discovered with sophisticated moisture detection meters.
Undetected moisture will continue to cause damage. This damage, at a minimum, will cause odors. Greater damage will surface when materials delaminate, shrink, split and further deteriorate to where costly repairs are required.
More than just removing excess water, IICRC-certified restorers have the knowledge and equipment to further dry a home or facility (including substructure materials) completely back to preloss conditions. Through timely response and the careful monitoring of water damage, mold and other health issues can be prevented. If water damage has been present too long, mold will occur.
All IICRC-certified professionals have the training and experience to identify moisture sources, evaluate mold growth (visible or suspected), contain damage, remove contamination and dry materials to ensure that mold will not return.
While there are many methods for drying structural components and contents, the “in-place” drying system has been taught in the industry and used by drying contractors since the early ’80s. In those days, this method of drying components, without significant removal of furnishings or fixtures, was somewhat restricted, due to limitations imposed by extraction, evaporation and dehumidification equipment. In recent years, however, drying technology (extraction, evaporation, dehumidification), along with better understanding of psychrometry, has advanced in major ways so that in-place drying has, in some cases, become far more safe and practical.
Washing Machine Hoses: A Disaster Waiting to Happen, Water Damage in Woodbury NJ
6/14/2017 (Permalink)
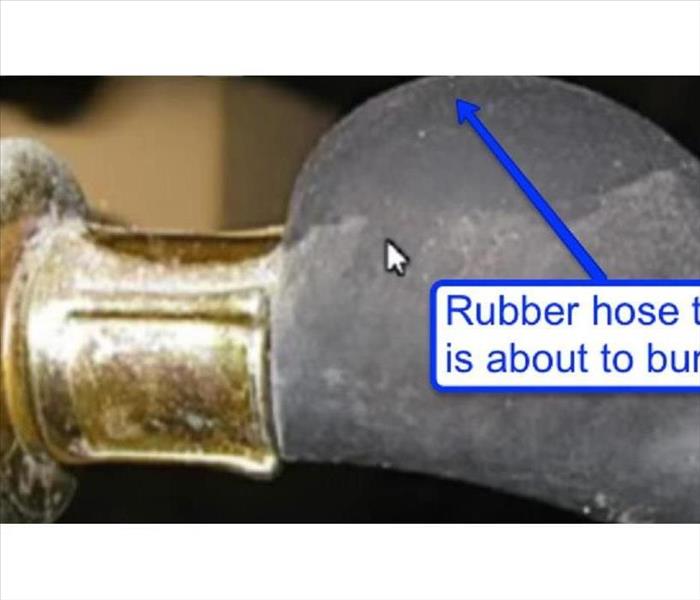 Washing Machine Hoses: A Disaster Waiting to Happen, Water Damage in Woodbury NJ
Though most property owners are careful to protect their buildings and possessions against fire, burglary, storms, and other dangerous conditions, they often overlook a situation that insurers know to be one of the most potentially destructive and costly: water damage caused by leaking or malfunctioning home appliances, especially washing machines. Unlikely as it may seem, water damage from washing machines is one of the top five causes of claims to home insurers, according to the Institute for Business and Home Safety, which analyzed 525 washing machine claims from multiple insurance companies.
Of all water damage claims related to washing machines, more than half – nearly 55% – are from water supply hoses that leaked or burst. And these claims are costly, with the average claim running to more than $6,000.
Why and How Do Washing Machine Hoses Fail? Over time, most washing machine hoses, even those that are installed properly, will eventually fail, leading to leaks or catastrophic floods caused when the hoses burst. Failure may be caused any of several factors, including age, installation error, poor-quality materials, and poor design. Under normal conditions, water in the hoses is under the same pressure as in other faucets in the building. When the hose becomes weakened, or when the connection is faulty, the water pressure will break the hose or coupling, sending water flooding out. In a typical residential plumbing system, water will spill out of a single burst hose at a rate of about 650 gallons per hour (that’s six gallons per minute, or 2½ tons per hour).
Because the supply lines to the washing machines are always “on,” water will flood from a broken hose until someone notices it and turns off the main supply line. If the hose breaks at night or when a building is unoccupied, thousands of gallons of water might flood the building before the problem is discovered. If the line breaks on a washing machine situated on an upper floor, the damage will be extensive as the water pours through the floors. Most traditional washing machine hoses are made of reinforced rubber or polymer.
These materials lose resiliency as they age, making them subject to cracks, leaks, and bursting. The IBHS study showed that failure rates increase dramatically in hoses that are more than five years old; the average age of failed hoses was 8.7 years. More than half of all failures occurred by the time the machine and its hoses were eight years old, and nearly 80% occurred before ten years. Improper installation can also damage the hose, leading to premature failure. The most common installation error is failure to leave sufficient room between the machine and the wall connection to prevent kinking or bending of the hose, particularly near the valve connections, as described below. Cracks, crimps, or blockages in the line will cause damage and lead to leaks or total failure.
Poor design (including fabrication from poor-quality materials) is probably the most significant factor in the failure of both kinds of hose commonly in use – the standard black rubber hose and the braided steel variety – though these products usually fail for different reasons, as described below. Standard black washer hoses are made of rubber tubing with a polyester reinforcement lining. The metal inserts at the coupling end are rolled and stamped from thin sheets of copper alloy. Most failures occur at the end of the hose, where the metal insert comes into contact with the tubing.
Failures generally occur for one of the following reasons: Razoring — The metal insert has a very sharp edge which is in direct contact with the rubber tube. This edge becomes progressively thinner and sharper as it is worn away by the movements of the water and by the effects of electrolysis. In a process called “razoring,” the motion of the washing machine causes the metal edge to rub repeatedly against the inside of the hose, cutting it gradually from the inside out. Stress Fractures — The metal insert is attached to the hose by a ferrule, or ring, which is crimped tightly to hold the pieces together. The crimping can cause a stress fracture in the hose, which is then subject to failure, especially as the rubber ages and begins to deteriorate.
Rusting — Corrosion (rusting) of the metal fitting can cause failure in two ways. First, as the thin metal fitting corrodes, it becomes jagged and rough and cuts into the hose as the washing machine operates. Water can leak between the hose and its outer covering, forming a bubble, a critical warning sign of imminent failure. Though a bubble may appear anywhere along the line, most breaks occur at the point where the metal fitting meets the rubber tube. Second, as the fitting continues to corrode, it can become so weak that it may eventually break apart. Braided stainless steel hoses (sometimes called “steel-clad” hoses) were designed as a reliable replacement for standard black hoses, but they, too, have been problematic. They have proven to be not much stronger than standard rubber hoses, and they are also subject to failures related to the to failures related to the materials from which they are fabricated.
Crimping — A braided stainless steel hose consists of a plastic or rubber tube covered with a braided steel sheath, which is sometimes protected with a thin nylon coating. Because of the variety of materials used, a very tight crimp is required to fasten the metal fitting securely to the hose. During the manufacturing process, this tight crimping can damage the hose by cutting into the rubber. Once the product is installed on a washing machine, the action of the water and the movements of the machine can make the cuts worse, leading to eventual failure. Corrosion — The stainless steel braided cover can oxidize when exposed to chloramine, a chemical increasingly popular in water treatment. Under these conditions, the stainless steel braided cover can weaken, fray, and even break, so that it can no longer provide strength to the hose.
Inspect Washing Machine Hoses Regularly In many cases, the hoses and fittings that connect the washing machine to the water source are visible and easy to inspect every time the machine is used. If your machine’s hoses are not visible, find out how to gain access to them in order to inspect them once a month or so. Inspect both hot and cold water lines. Most failures occur near the connection, where the hose typically bends. Here’s what to look for: Signs of Imminent Failure. Look for obvious signs of deterioration or imminent failure, such as blisters, bulges, bubbles, cracks, unraveling, discoloration, crimps, or kinks, especially near the connections and turns in the hose. Leaks. Check for moisture, drips, rust, discoloration, or leaks in, on, or around the hoses and connections or in the catch pan (if present). Check the connections to be sure that they are tightened properly, as described below. Even a small leak may indicate an imminent failure. Proper Positioning. Be sure that the washing machine is located at least four inches from the connections (usually at the wall) so that the hose is not bent or kinked. Check to see that the machine is properly balanced so that it does not “walk” during use. The motion of a “walking” machine will place added stress on the hoses and connections.
Replace Defective or Aging Hoses Immediately!
Water damage can be deceptive, Water Damage in Deptford NJ,
6/5/2017 (Permalink)
 Water damage can be deceptive, Water Damage in Deptford NJ,
Water damage can be deceptive. Water penetrates into structural cavities creating trapped pockets of saturation. The detection of water in these areas can often only be discovered with sophisticated moisture detection meters. Undetected moisture will continue to cause damage. This damage, at a minimum, will cause odors. Greater damage will surface when materials delaminate, shrink, split and further deteriorate to where costly repairs are required.
More than just removing excess water, IICRC-certified restorers have the knowledge and equipment to further dry a home or facility (including substructure materials) completely back to preloss conditions. Through timely response and the careful monitoring of water damage, mold and other health issues can be prevented. If water damage has been present too long, mold will occur.
All IICRC-certified professionals have the training and experience to identify moisture sources, evaluate mold growth (visible or suspected), contain damage, remove contamination and dry materials to ensure that mold will not return.
While there are many methods for drying structural components and contents, the “in-place” drying system has been taught in the industry and used by drying contractors since the early ’80s. In those days, this method of drying components, without significant removal of furnishings or fixtures, was somewhat restricted, due to limitations imposed by extraction, evaporation and dehumidification equipment. In recent years, however, drying technology (extraction, evaporation, dehumidification), along with better understanding of psychrometry, has advanced in major ways so that in-place drying has, in some cases, become far more safe and practical.
Water Damage in Westville NJ, Detect and Prevent
5/31/2017 (Permalink)
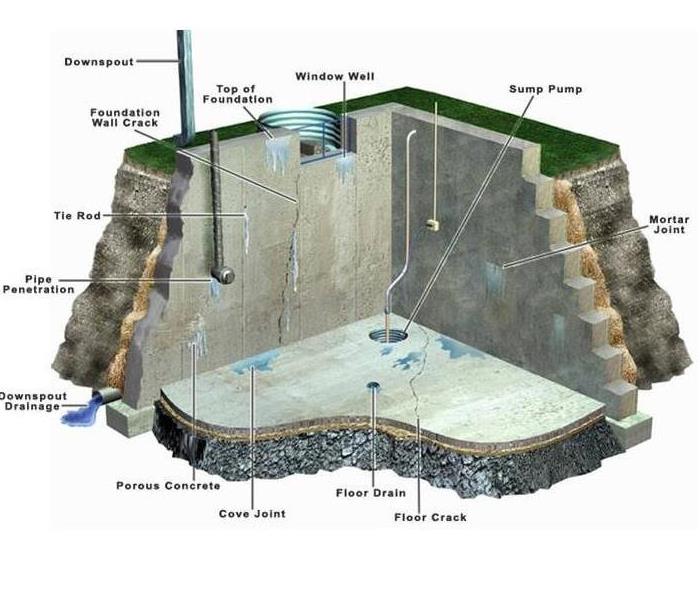 Water Damage in Westville NJ, Detect and Prevent
Standing water on the floor is easy to see. Less obvious signs of problems include:
- Unexpected increases in your water bill
- Stains on walls, floors or ceilings
- Damaged or warped flooring
- Warped bottom panels in under-sink cabinets
- Peeling paint or wallpaper
- Corrosion on plumbing valves and fittings
Deal with problems as you find them. Clean up any water or moisture, locate the source and make repairs. Tracking down a leak isn't always straightforward — water can travel along components in the building structure, so the indications of the leak may be in a different part of the home than the leak itself. If necessary, contact a professional roofing contractor, plumber or water damage restoration specialist to help with identification and repair.
In addition to the damage that water causes, it can encourage the growth of mold on walls and floors — where it's readily visible — and in ductwork, attics and crawl spaces — where you might not notice it. A musty odor is a sign that mold may be present.
Mold can cause damage and lead to health problems — deal with it quickly. If the affected area is larger than 3 feet by 3 feet, the Environmental Protection Agency recommends you find a professional mold remediation contractor. For smaller areas, you can clean nonporous surfaces with commercial cleaning products, soap and water or a solution of a cup of bleach to each gallon of water. Follow the instructions and safety precautions for the cleaning product you use and wear appropriate safety gear. Porous surfaces such as drywall need to be replaced. For more information on mold in the home and how to clean it up, see A Brief Guide to Mold, Moisture, and Your Home on the EPA's web site.
Inspecting common sources of water leaks and taking some simple preventative measures can be an effective way to reduce the risk of water damage and mold.
Plumbing
- Every 6 to 12 months, inspect water lines, shut-off valves and fittings for fixtures such as sinks, toilets and tubs and for appliances such as washing machines, dishwashers and ice makers. Check for cracks, loose connections, kinks and corrosion. If you find a leak, turn off the water to the fixture or appliance until you can make repairs.
- Check around toilets to make sure water is not leaking at the base — an indication that the wax ring between the toilet and floor might need replacing or that there might be a crack in the base.
- If the temperature drops near the 20°F mark, allow faucets connected to vulnerable pipes — those not protected in insulated spaces — to drip. This helps minimize the risk of burst pipes by relieving pressure if the pipes freeze.
Appliances
- Replace washing machine supply hoses at least every five years. Consider using stainless-steel mesh hoses. Keep the machine properly balanced — over time, an unbalanced machine can move, pulling free the hose connections. Read Maintain Your Washer and Dryer for instructions on replacing hoses and balancing the washing machine.
- Consider turning off the water to the washing machine when it's not in use.
- Don't operate a dishwasher or washing machine while your house is unoccupied.
- Follow the manufacturer-specified maintenance for your appliances, including your water heater. Have the water heater inspected every couple of years.
Roof and Gutters
- Have your roof inspected every three years by a professional, but also check routinely for damage you can see from the ground — such as broken and missing shingles or damaged flashing. A poorly maintained roof can lead to leaks in the home and additional damage to the roof itself.
- If your roof doesn't have a drip edge or drip cap, consider having one added. This component helps keep water away from the roof deck and directs runoff into gutters.
- Keep gutters clear and well-maintained. Gutters that overflow, leak or don't drain properly allow water to seep into your roof and into your foundation, crawlspace or basement. See Gutter Cleaning and Repair for steps to keep your gutters working correctly.
- Make sure gutter downspouts direct rainwater away from the home's foundation. Use extensions to carry water at least 6 feet from the house.
Exterior Walls and Foundation
- Inspect the exterior of your home. Caulk around gaps at plumbing and ventilation entry and exit points. See How to Caulk for instructions. Repair cracked mortar joints.
- Check to see if roots from shrubs near your home have caused damage that can allow water to enter the foundation. You may need to remove shrubs that are close to the house to prevent problems. Roots can also damage and block in-ground pipes, causing leaks near the foundation and sewer backups in the home.
- Keep shrubbery beds and other landscape features sloped to direct water away from the home.
- Look for evidence of erosion or settling at the foundation that can indicate water problems.
Additional Tips to Avoid Water Damage
- Have your attic ventilation and insulation inspected annually and seal gaps that allow warm air into the attic — such as those around access doors and light fixtures. When warm air collects in the attic, it can lead to the formation of an ice dam — ice around the eaves that causes water from melting snow and ice to back up under the shingles and leak into your home.
- If you have a sump pump, test it several times during the year. Follow the manufacturer's maintenance instructions.
- Check your water pressure with a pressure gauge; typically these screw onto a hose bib. The pressure in an average home is around 50 to 70 pounds per square inch (psi). Higher pressure causes extra stress on pipes and fittings and can lead to leaks.
- Inspect tile and grout around showers and tubs. Make any necessary repairs. Read Replace a Broken Ceramic Tile and Repair Tile Grout for step-by-step instructions.
- Check for leaks around windows during rains and seal any you find.
- Use exhaust fans in the kitchen and bathroom to move excess moisture out of the house. Moisture in the air can condense on cool surfaces and cause problems. Read Controlling Moisture and Humidity in the Home for more ways to reduce indoor moisture.
- Locate your water shut-off valve so you can quickly turn off water to the home in an emergency. See Shut Off Your Home Water Supply for instructions on locating the valve.
Roof Leaks in Woodbury, NJ, Shingle Damage in Woodbury, NJ, Chimney Leaks, and Tips for Preventing Leaks
5/24/2017 (Permalink)
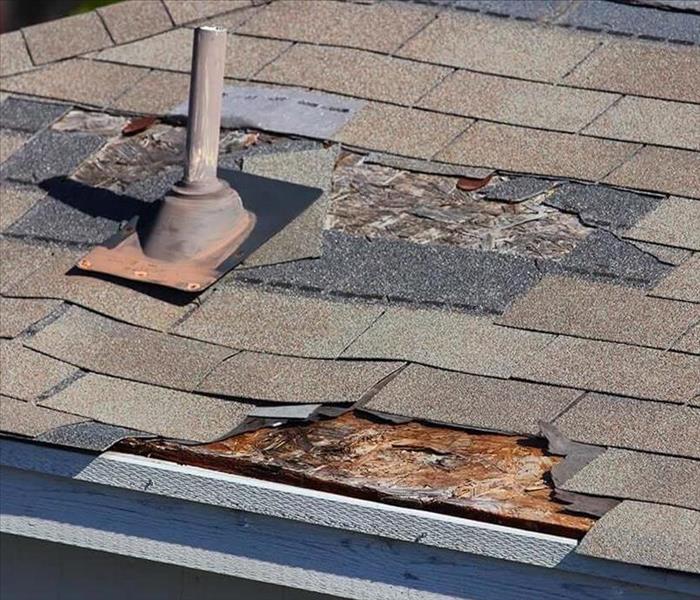 Roof Leaks in Woodbury, NJ, Shingle Damage in Woodbury, NJ, Chimney Leaks, and Tips for Preventing Leaks
Check for damage in the roofing material directly above where the leak is coming in. This will likely be easier to find on a flat roof, but leaks can also come into the house a good distance from where the actual roof damage is located.If your roof is slanted, inspect areas on the roof that are higher than where the leak enters the home.
If you have an attic, inspect it with a flashlight for water stains, black marks or mold.
Run a hose along different sections of the roof and have a person inside alert you when leaking occurs.
Look for damaged, curled or missing shingles near where the leak is coming in. Look closely for exposed roofing tacks, too.
Straighten out shingles that are curled back. In colder weather, this might require that you soften the shingle edge with heat, such as an electric hair dryer. Using a torch or other open flame heat source isn't recommended since asphalt shingles may be flammable, and regardless of whether they are flame retardant or not, excess heat will ruin the shingle.
Reattach curled-back shingles after straightening with a generous amount of asphalt roof cement or compound around the exposed edges.
Replace damaged shingles. If the shingle lifts off the roof with little effort, breaks, or simply crumbles, it needs to be replaced.Remove the old shingle by lifting its edges and prying out the nail.
Scrape the area underneath it to remove any leftover roofing cement.
Use a sharp utility knife to round the back corners of the new shingle slightly.
Slide the new shingle into place and drive 1 1⁄4 inch (3.2 cm) galvanized roofing nails into each upper corner, then cover the nail heads with roof cement.
Inspect for cracks or blisters in the roofing material.
Mend the blisters. Cut a line through the middle of the blister with a utility knife, but do not cut the sound roofing felt {substrate) underneath.Squeeze out or soak up any water inside the blister. The area needs to be completely dry.
Spread a generous amount of roofing cement under the loose roofing material and press down.
Drive galvanized roofing nails along each side of the repaired blister.
Inspect areas where surfaces connect, such as a chimney or vent pipe.
Look for damage to the caulking, and reapply caulk where necessary.
Remove damaged or deteriorated caulking so the new application can bond to the roof or flashing surface.
Use a putty knife to remove the loosened old caulk.
Clean and dry the area.
Cut the tip off the caulk tube and spread a bead along the same line, working it into the crack with an applicator. Let it dry.
Larger-scale repairs will be necessary if there is damage to the flashing around the chimney or the boots around vents, as these features may need to be replaced.
Flood damage in Woodbury, NJ, and Insurance Property Damage Claims, What You May Need to Know
5/23/2017 (Permalink)
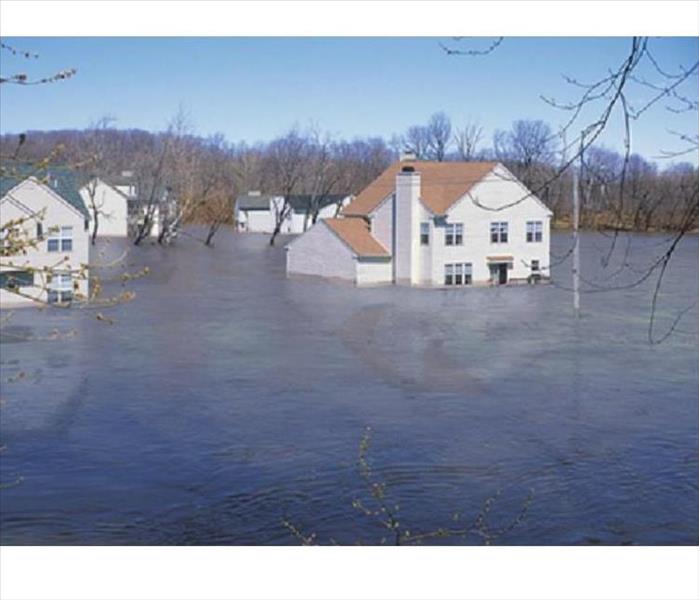 Flood damage in Woodbury, NJ, and Insurance Property Damage Claims, What You May Need to Know
Rising waters and flood damage can cost tens of thousands of dollars to repair. Most homeowner, who has insurance, will want to make a claim. While all insurance companies don’t have flood coverage, usually a separate policy is purchased in areas where flood waters are a risk. While some insurance companies can take a claim over the phone, an insurance claim letter is always the best way to go. Sure you can call, but a letter can say much more and include valuable pictures. This letter needs to contain specific information about the incident, and when it occurred. All this is valuable and necessary to a claim.
Since this is a formal letter, make sure it is appropriately set up. A block style format should be observed. The name and address of the claimant, followed by the date and then the name and address of the insurance company should always be on the left hand side. A subject line would also be appropriate in this type of correspondence. Unless you know someone personally at the insurance company, you will probably need to address it with a general "To Whom It May Concern," or a “Dear Sir/Madam.”
Start the first paragraph by telling them why you are writing. As a matter of fact, make sure this is in the first sentence. You want to make sure your needs are specified loud and clear. You need to be very specific in your writing and make sure to not leave out any details. If the carpet in the basement is ruined, say so. Specify the date the incident happened and the event that triggered it. Are there other homes in the area directly affected? Make sure to put as much info as you can in the first paragraph.
Giving background information is always helpful to an adjuster. Did you call in an extraction company? Many people call in extraction services before they call the insurance company. These companies can remove the water and do their best to save furniture and carpet. Make sure to specify any methods used to try to save the items. Don't leave out problems with drywall, electric and other critical items. These are of the up-most importance. Just because you got the water out of an item, doesn't mean the problems will stop. Oftentimes, mold will set into areas that have had severe water damage.
Make sure the tone of the letter is friendly. Give information that is necessary to the claim, like account numbers, who the policy’s name is under etc. Also state what you believe your policy limits are, if known. Encourage the company to clear the matter up quickly. Give them an invitation to call or contact you as soon as possible. This letter, along with picture evidence, is a great way to get the ball rolling on your claim. The sooner you contact the insurance company, the sooner you can have your damages repaired. End your letter with a formal conclusion and contact information.
Indoor Relative Humidity and Moisture issues, Inside Your Property, in Woodbury, NJ
5/19/2017 (Permalink)
 Indoor Relative Humidity and Moisture issues, Inside Your Property, in Woodbury, NJ
When indoor humidity levels are too high, condensation on windows and walls starts to cause structural damage. Damage to the house manifests in wood rot, molds, damp spots, and corroding furniture.
Costly damage caused by moisture that builds up can occur between the walls and ceilings, paint may start to peel as well as permanent wood warping/damage.Every time we cook, bathe, shower or breathe, we increase the amount of moisture in the air; when these activities occur indoors, we raise the humidity level inside our home. Humidity is the amount of water vapor in the air; it makes the air feel wet and clammy or smell musty. During a hot summer day, humidity makes the air feel even warmer, since it prevents sweat from evaporating from the skin, undermining the body's way of staying cool.
Relative humidity is the amount of water the air contains compared to the amount it could contain at a specific temperature. When the relative humidity is 100 percent, the air is retaining the most moisture possible at that temperature without precipitation. Most of us feel comfortable inside our home when the relative humidity remains between 30 and 60 percent. When the indoor humidity level is below 30 percent, the air is too dry, which can harm both a home's structural integrity and the homeowners' health. Conversely, when the level is above 60 percent, the air is too wet, which is also harmful to both the home and the homeowners. Excess humidity is a breeding ground for mold, pests and rot in homes and is more likely to cause heatstroke, heat exhaustion, headaches and dehydration than a less humid atmosphere.
To combat a high humidity level inside the home, many homeowners run the air conditioning unit. While air conditioning can reduce the humidity level, the result is high energy bills and a cold and uncomfortable living space. Rather than using air conditioning, homeowners and builders can have a whole-house dedicated dehumidification system installed. This type of system operates using the home's central air distribution system. A dehumidification system can be programmed to maintain specific humidity levels, giving homeowners the ability to customize the comfort level of their home.
Whole-house dehumidification systems can be installed in both new and existing homes. Here are a few points to keep in mind when considering installing dedicated dehumidification systems:
- Choose a dehumidification system that has built-in fan cycling. This feature will keep the humidity and temperature balance steady throughout the home instead of in just one room. It will also minimize hot and cold spots and improve the overall air quality.
- Look for a dehumidification system that has the capacity to remove up to 90 pints of moisture per day from the air. For builders, a high-capacity system will provide for the flexibility of using the system in a wide variety of homes.
Air Conditioner Problems, and Prevent AC Condensation leaking into your Property, Water damage in Deptford, NJ
5/18/2017 (Permalink)
 Air Conditioner Problems, and Prevent AC Condensation leaking into your Property, Water damage in Deptford, NJ
One of the most common air conditioning problems is improper operation. If your air conditioner is on, be sure to close your home's windows and outside doors. For room air conditioners, isolate the room or a group of connected rooms as much as possible from the rest of your home. For a list of common air conditioner problems and what to look for, check out our Energy Saver 101 infographic on home cooling.
Other common problems with existing air conditioners result from faulty installation, poor service procedures, and inadequate maintenance. Improper installation of a central air conditioner can result in leaky ducts and low airflow. Many times, the refrigerant charge (the amount of refrigerant in the system) does not match the manufacturer's specifications. If proper refrigerant charging is not performed during installation, the performance and efficiency of the unit is impaired. Unqualified service technicians often fail to find refrigerant charging problems or even worsen existing problems by adding refrigerant to a system that is already full. Learn what to ask for when hiring a technician to maintain your air conditioner.
Air conditioner manufacturers generally make rugged, high quality products. If your air conditioner fails, begin by checking any fuses or circuit breakers. Let the unit cool down for about five minutes before resetting any breakers. If a central air conditioner's compressor stops on a hot day, the high-pressure limit switch may have tripped; reset it by pushing the button, located in the compressor's access panel.
REFRIGERANT LEAKS
If your air conditioner is low on refrigerant, either it was undercharged at installation or it leaks. If it leaks, simply adding refrigerant is not a solution. A trained technician should fix any leak, test the repair, and then charge the system with the correct amount of refrigerant. Remember that the performance and efficiency of your air conditioner is greatest when the refrigerant charge exactly matches the manufacturer's specification, and is neither undercharged nor overcharged. Refrigerant leaks can also be harmful to the environment
INADEQUATE MAINTENANCE
If you allow filters and air conditioning coils to become dirty, the air conditioner will not work properly, and the compressor or fans are likely to fail prematurely.
ELECTRIC CONTROL FAILURE
The compressor and fan controls can wear out, especially when the air conditioner turns on and off frequently, as is common when a system is oversized. Because corrosion of wire and terminals is also a problem in many systems, electrical connections and contacts should be checked during a professional service call.
SENSOR PROBLEMS
Room air conditioners feature a thermostat sensor, located behind the control panel, which measures the temperature of air coming into the evaporative coil. If the sensor is knocked out of position, the air conditioner could cycle constantly or behave erratically. The sensor should be near the coil but not touching it; adjust its position by carefully bending the wire that holds it in place.
DRAINAGE PROBLEMS
When it's humid outside, check the condensate drain to make sure it isn't clogged and is draining properly. Room air conditioners may not drain properly if not mounted level.
Common Causes of AC Water Leakage
The following issues can cause water leaks in your central AC system:
Clogged Drain Line
A clogged condensate drain pipe can make your AC system’s drain pan overflow. This is probably the most frequent cause of water leakage from a central AC system, bringing many service calls to HVAC professionals as summer temperatures rise. Drain lines can become clogged with dirt, rust, algae and other debris.
Disconnected Drain Line
When AC systems are improperly installed drain pipe fittings may not be secure. Over time, they can loosen, causing the drain pipe to disconnect from the AC unit and allowing the condensate to drain through the ceiling or onto the floor. As with a clogged drain line, the location of the leak will depend on whether the primary or secondary drain pipe is the one affected and whether your central AC system is located in the attic or in your house.
Condensate Pump Problems
A malfunctioning or dirty condensate pump can also cause water leakage from your AC system, flooding your attic or basement. Due to the continual presence of water, mold and mildew can grow inside the unit, causing it to clog.
Other Potential Causes of AC Water Leakage
Water leaks can also be caused by the following issues:
- Clogged air filter
- Low refrigerant
- Cracked condensate drain pan
- No p-trap and air vent in the drain line to prevent water backup
- Condensate buildup in un-insulated ductwork
The first two issues in the list above can contribute to a frozen evaporator coil, which creates its own set of water leakage problems.
Ways to Avoid Damage from Water Leakage
Follow these tips to reduce the likelihood of water leakage issues:
- Make sure your central AC system has a secondary drain line — especially if your air handler is in the attic.
- Install a drain pan overflow shutoff switch, equipped with a float.
- Add a safety pan under your AC unit to catch drain pan overflow.
- Clean or change your HVAC air filter regularly.
- Make sure your ductwork is properly insulated.
- Have your AC refrigerant levels checked regularly.
- Make sure each drain line contains a p-trap and air vent.
- Keep your condensate pump free from mold and mildew by flushing it with a 50% bleach/water solution.
- Schedule annual HVAC maintenance to maximize performance and minimize furnace and AC repairs.
TOP 10 CAUSES OF WATER DAMAGE IN YOUR HOME AND PROPERTY!
5/10/2017 (Permalink)
 TOP 10 CAUSES OF WATER DAMAGE IN YOUR HOME AND PROPERTY!
Old plumbing and leaky appliances around the house aren’t out to get you, but sometimes it seems that way. The weather plays a part too with winter freezes that burst pipes and spring rains that flood basements.Our cleanup and restoration teams have seen it all here in Chicago and the surrounding suburbs. In our experience, these are the 10 most common causes of residential water damage that can affect your home. Our list also includes helpful links and tips on how to handle each type of wet disaster.
1. The Toilet Runs and Drips
When it constantly runs, it’s annoying and expensive. When it springs a bad leak, it can ruin floors and walls. The trick to fixing a leaky toilet is figuring out why it’s turned into a water hazard. Once you pinpoint the problem, repairs are usually simple and inexpensive.
2. Pressure Gets to the Washing Machine
Your washing machine quickly fills with water because its supply lines are under constant pressure. Older rubber or PVC lines wear out and rupture, and that failure turns the laundry room into a flood zone. Avoid this potential mess by replacing old lines with braided stainless steel.
3. Your Garbage Disposal Floods Cabinets
Most disposal leaks are DIY fixable, but when this appliance stops working, it can go out with a splash. As the body of the unit gets old, it springs leaks around the bottom housing and floods cabinets with a dirty mix of food garbage and water. When this happens, you need to replace the disposal.
4. Your AC Soaks the Ceiling
The AC pulls humidity out of the air and condenses moisture into the unit’s overflow pan so that water travels outside through the condensate line. This drainage system quits working if the pan is damaged or the line is clogged. The results are soggy insulation and soaked ceilings.
5. The Water Heater Develops Leaks
This appliance is often located in basements, and that can make cleanup even more challenging after a bad leak. Sometimes, a water heater problem is due to condensation, but it’s more likely a faulty water outlet or drain valve. Older units can develop leaks in the bottom of the tank and flood the entire basement.
6. Frigid Temperatures Burst Pipes
This water emergency is confined to cold months, but you have to be prepared. Pipes can freeze and rupture in just a few hours, and the flooding can soak the house from ceiling to basement. Always check and insulate your plumbing before the Chicago winter settles in.
7. Fire Sprinkler Systems Freeze Too
High-rises, condos and newer homes feature these life-saving systems, but residential fire sprinklers are prone to freezing without proper winter maintenance. Cold-weather sprinkler routines keep the family safe and help avoid water damage from ruptured pipes.
8. The Sump Pump Stops Pumping
Whether it’s caused by heavy rain or appliance failure, water in the basement is a disaster when the sump pump stops working. You have to deal with water removal, thoroughly dry everything and address mold and mildew growth. It’s often best to let professionals handle basement flooding.
9. Drains Quit Draining
This simple outlet can complicate an ordinary day by leaving standing water in a tub, the kitchen sink or the basement. A stopped-up tub or sink is a big nuisance, but a clogged floor drain can result in a basement filled with water. Your DIY solutions range from drain snakes to air blasters.
10. Sewer Lines Back Up
Don’t try to handle this problem by yourself. Backed-up sewer lines are caused by blockage or heavy rainfall, and they quickly spread dangerous contaminants that create a very unhealthy environment. Sewage backup and flooding should always be taken care of by certified professionals.
Water Damage in Your Property?
4/27/2017 (Permalink)
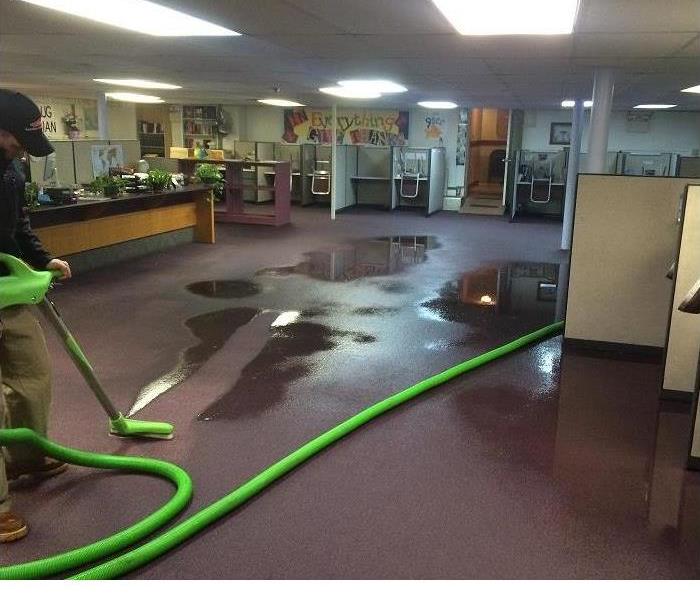 Water Damage in Your Property?
Water damage describes a large number of possible losses caused by water intruding where it will enable attack of a material or system by destructive processes such as rotting of wood, growth, rusting of steel, de-laminating of materials such as plywood, and many others.
The damage may be imperceptibly slow and minor such as water spots that could eventually mar a surface, or it may be instantaneous and catastrophic such as flooding. However fast it occurs, water damage is a major contributor to loss of property.
An insurance policy may or may not cover the costs associated with water damage and the process of water damage restoration. While a common cause of residential water damage is often the failure of a sump pump, many homeowner's insurance policies do not cover the associated costs without an addendum which adds to the monthly premium of the policy. Often the verbiage of this addendum is similar to "Sewer and Drain Coverage".
Those individuals who are affected by wide scale flooding may have the ability to apply for government and FEMA grants through the Individual Assistance program. On a larger level, businesses, cities, and communities can apply to the FEMA Public Assistance program for funds to assist after a large flood. For example, the city of Fond du Lac Wisconsin received $1.2 million FEMA grant after flooding in June 2008. The program allows the city to purchase the water damaged properties, demolish the structures, and turn the properties into public green space.
Causes
Water damage can originate by different sources such as a broken dishwasher hose, a washing machine overflow, a dishwasher leakage, broken/leaking pipes, and clogged toilets. According to the Environmental Protection Agency, 13.7% of all water used in the home today can be attributed to plumbing leaks.[3] On average that is approximately 10,000 gallons of water per year wasted by leaks for each US home. A tiny, 1/8-inch crack in a pipe can release up to 250 gallons of water a day.[4]According to Claims Magazine in August 2000, broken water pipes ranked second to hurricanes in terms of both the number of homes damaged and the amount of claims (on average $50,000 per insurance claim costs in the US. Experts suggest that homeowners inspect and replace worn pipe fittings and hose connections to all household appliances that use water at least once a year. This includes washing machines, dishwashers, kitchen sinks and bathroom lavatories, refrigerator ice makers, water softeners and humidifiers. A few US companies offer whole-house leak protection systems utilizing flow-based technologies. A number of insurance companies offer policy holders reduced rates for installing a whole-house leak protection system.
As far as insurance coverage is concerned, most damage caused by bad weather is considered flood damage and normally is not covered under homeowners insurance. Coverage for bad weather would usually require flood insurance.
Categories
Category 1 Water - Refers to a source of water that does not pose substantial threat to humans and classified as "clean water". Examples are broken water supply lines, tub or sink overflows or appliance malfunctions that involves water supply lines.
Category 2 Water - Refers to a source of water that contains a significant degree of chemical, biological or physical contaminants and causes discomfort or sickness when consumed or even exposed to. Known as "grey water". This type carries micro organisms and nutrients of micro organisms. Examples are toilet bowls with urine (no feces), sump pump failures, seepage due to hydrostatic failure and water discharge from dishwashers or washing machines.
Category 3 Water - Known as "black water" and is grossly unsanitary. This water contains unsanitary agents, harmful bacteria and fungi, causing severe discomfort or sickness. Type 3 category are contaminated water sources that affects the indoor environment. This category includes water sources from sewage, seawater, rising water from rivers or streams, ground surface water or standing water. Category 2 Water or Grey Water that is not promptly removed from the structure and or have remained stagnant may be re classified as Category 3 Water. Toilet back flows that originates from beyond the toilet trap is considered black water contamination regardless of visible content or color.
Classes
Class of water damage is determined by the probable rate of evaporation based on the type of materials affected, or wet, in the room or space that was flooded. Determining the class of water damage is an important first step, and will determine the amount and type of equipment utilized to dry-down the structure.[7]
Class 1 - Slow Rate of Evaporation. Affects only a portion of a room. Materials have a low permeance/porosity. Minimum moisture is absorbed by the materials.
Class 2 - Fast Rate of Evaporation. Water affects the entire room of carpet and cushion. May have wicked up the walls, but not more than 24 inches.
Class 3 - Fastest Rate of Evaporation. Water generally comes from overhead, affecting the entire area; walls, ceilings, insulation, carpet, cushion, etc.
Class 4 - Specialty Drying Situations. Involves materials with a very low permeance/porosity, such as hardwood floors, concrete, crawlspaces, plaster, etc. Drying generally requires very low specific humidity to accomplish drying.
Restoration
See also: Convectant drying
Different removal methods and measures are used depending on the category of water. Due to the destructive nature of water, chosen restoration methods also depend heavily on the amount of water, and on the amount of time the water has remained stagnant. For example, as long as carpet has not been wet for longer than 48 hours, and the water involved was not sewage based, a carpet can usually be saved; however, if the water has soaked for longer, then the carpet is probably irreparable and will have to be replaced.[8] Water damage restoration can be performed by property management teams, building maintenance personnel, or by the homeowners themselves; however, contacting a certified professional water damage restoration specialist is often regarded as the safest way to restore water damaged property.
Standards and regulation
While there are currently no government regulations in the United States dictating procedures, two certifying bodies, the Institute of Inspection Cleaning and Restoration Certification (IICRC) and the RIA, do recommend standards of care. The IICRC-recommended standard is IICRC S500.
Fire and Water Restoration companies are regulated by the appropriate state's Department of Consumer Affairs - usually the state contractors license board. In California, all Fire and Water Restoration companies must register with the California Contractors State License Board.[10] Presently, the California Contractors State License Board has no specific classification for "water and fire damage restoration."
Procedures
Water damage restoration is often prefaced by a loss assessment and evaluation of affected materials. The damaged area is inspected with water sensing equipment such as probes and other infrared tools in order to determine the source of the damage and possible extent of area affected. Restoration services would then be rendered to the residence in order to dry the structure, sanitize any affected or cross contaminated areas, and deodorize all affected areas and materials. After the labor is completed, water damage equipment including air movers, air scrubbers, dehumidifiers, wood floor drying systems, and sub floor drying equipment is left in the residence. Industry standards state that drying vendors should return at regular time intervals, preferably every twenty-four hours, to monitor the equipment, temperature, humidity, and moisture content of the affected walls and contents.
Refrigerator Water Line and Drain Hose Leaks...Prevention Tips!
4/13/2017 (Permalink)
 Refrigerator Water Line and Drain Hose Leaks...Prevention Tips!
Refrigerator Water Line Leaks, Prevention Tips!
The refrigerator is one of the hardest working appliances around the home, so when one breaks down or suffers a leak, the experience can have consequences. If you find that your fridge’s water line has a leak, there are a few simple steps you can follow to troubleshoot the problem and have it running again in no time.
What To Do When Your Refrigerator Water Line Leaks
The first step is to identify the leak. The refrigerator water line connects the household water supply to a refrigerator with an ice maker or water dispenser. The water line typically runs at the back of the fridge. Once the leak has been identified, here is what you can do to fix the problem.
- Turn off the valve that supplies water to the refrigerator and then unplug the refrigerator to turn off the appliance. You will likely find the water shut off valve located beneath the kitchen sink or in some cases, behind the refrigerator itself.
If the valve is located behind the fridge, carefully pull the appliance away from the wall and turn off the valve.
You will now have to loosen the compression nut that secures the supply line to the water intake valve. This can be done with the assistance of an adjustable wrench by turning the nut counter clockwise and then disconnecting the supply line.
Once loosened, remove the compression nut to disconnect the supply line from the valve.
If the supply line is broken or torn in places, replace the old line with a new one making sure that its length and dimensions are the same as the original water line. Material choices range between copper, plastic and stainless steel water lines.
- To fix the new water line in place, thread one end of the supply line to the shut off valve under the sink and tighten until it is snug in place. When using a copper or plastic line, make sure to first slide on a compression nut secured with a compression sleeve or ring onto the end of the line. A stainless steel water line comes with a built in rubber gasket that stops the connection from leaking.
- Thread the other end of the supply line to the water intake valve and tighten it until snug.
- Turn on water and check for any leaks. If there is still a drip, tighten the nuts a bit more.
Purchasing a new water line
When the line is badly damaged and needs replacement there are a few things to keep in mind. For instance, one of the factors at this point would be to choose a line material that will offer durability and long lasting utility. Another is the price tag attached to the new purchase.
Plastic water lines
In terms of materials, plastic lines are the most cost effective but also least durable. The biggest threat lies in these lines cracking, clogging or leaking, causing water damage. While plastic lines may seem to work well in terms of flexibility, especially where space behind the fridge is tight, many people do not prefer this type of line material.
Copper water lines
Another option is to go with copper water lines that yield superior sturdiness but are also more prone to kinkiness. A more flexible version of copper lines is available to allow pushing the tubing into position giving it some flexibility to work well in cramped spaces.
Stainless steel water lines
As an alternative stainless steel braided lines can be considered. Braided steel is a tough, non-kinking option to the more pliable plastic and the ¼ in flexible copper lines. Stainless steel also happens to be the most durable option but will tend to be the most expensive as well.
Whether the leak in your refrigerator water line is caused by a plastic, copper or stainless steel water line, remember that you can always access the professional service of our experts at Tidal Wave in Atlanta to come and resolve all water damage concerns at your home.
Jon Barrett
Marketing and Sales Support
SERVPRO of Cherry Hill/Haddonfield
Phone: (856) 662-2772
Email: JBarrett@SP9157.com
Websites:
http://www.SERVPROcherryhillhaddonfield.com/
http://www.SERVPROmtlaurelmoorestown.com/
basement flooding
1/18/2017 (Permalink)
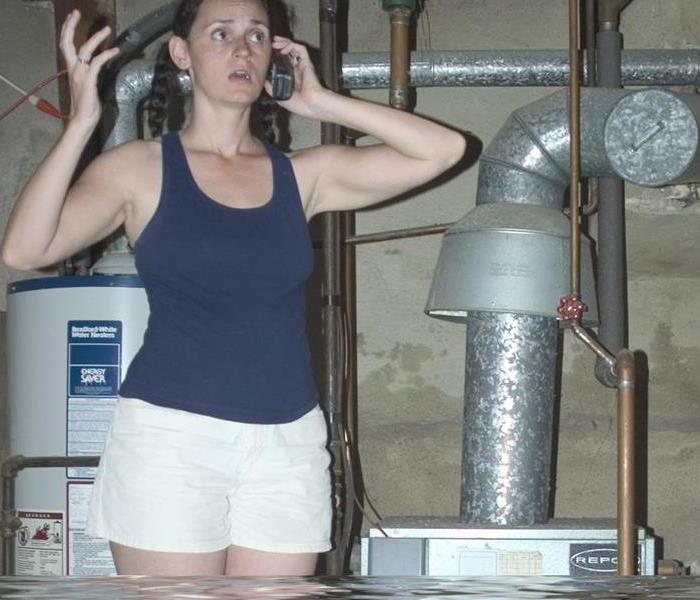 flooding
- Floods are the #1 natural disaster in the United States.
- From 2011 to 2015, the average flood claim amounted to more than $46,000.
- From 2006 through 2015, total flood insurance claims averaged more than $1.9 billion per year.
- In 2015, the average policy premium was nearly $700.
- Even though flood insurance isn't federally required, anyone can be financially vulnerable to floods. In fact, people outside of mapped high-risk flood areas file more than 20 percent of all National Flood Insurance Program flood insurance claims and receive one-third of Federal disaster assistance for flooding.
- The NFIP paid more than $839 million in flood insurance claims to all policyholders in 2015.
- 2015 CLAIM REPORT FOR THE TOP 10 STATES
Texas9,670
South Carolina3,715
Florida1,079
New Jersey 1,045
Kentucky 1,034
ice dams
1/11/2017 (Permalink)
ICE DAMS: Several quick fixes but only one cure.
An Ice Dam is a hump of ice that forms at the edge of a roof under certain wintertime conditions. An ice dam can damage both your roof and the inside of your home. It will put gutters and downspouts at risk too.
Ice Dams are a common sight in Northern New England winters, and Home Partners has dealt with quite a few. There are several things you can do to avoid getting an ice dam or to reduce the risk of damage after one has formed, but there’s really only one cure: a combination of better sealing, insulation, and venting in the attic and eaves.
HOW DO ICE DAMS FORM?
An ice dam forms when the roof over the attic gets warm enough to melt the underside of the layer of snow on the roof. The water trickles down between the layer of snow and the shingles until it reaches the eave of the roof, which stays cold because it extends beyond the side of the house. There, the water freezes, gradually growing into a mound of ice.
The flatter the pitch of the roof, the easier it is for an ice dam to get a grip. Gutters at the eaves can also trap snow and ice. If snow and ice build up high enough in the gutter, it can provide a foundation for an ice dam.
WHAT DAMAGE DO ICE DAMS CAUSE?
When an ice dam gets big enough, melted water backs up behind it and seeps underneath the shingles. Eventually, it will drip into the insulation and down into the ceilings and exterior walls beneath the eave, ruining sheetrock and paint. If the ice dam breaks free, it can pull shingles and gutters off with it, and it will damage anything it falls on: shrubs, windowsills, cars, pets, and people. If the roof sheathing stays wet, it can form mildew and start to rot
DEALING WITH EXISTING ICE DAMS
1. Remove the ice dam by breaking it free in small chucks. Do NOT use an ax or other sharp tool! You’ll cut through the shingles. Instead, tap lightly with a blunt mallet. This is slow, dangerous work, so hire someone experienced at roofing. Even if you do it safely, the chunks of ice can take pieces of shingle with them.
2. Clear out gutters and downspouts. Again, this is ladder work and an easy way to damage either plastic or metal gutters and spouts.
3. Melt troughs through the ice dam with calcium chloride ice melter. Do NOT use rock salt! It will damage paint, metals, and plants beneath the eave and wherever the salty water drains.
A good trough-maker is a tube of cloth (a leg from an old pair of panty hose works well). Fill it with calcium chloride, tie off the top, and lay it vertically across the ice dam. It will slowly melt its way down through the dam, clearing a path for the underlying water to flow free.


 24/7 Emergency Service